Welcome to the unofficial guide for SAGE Starbased, the latest iteration of SAGE Labs! This guide explains everything you need to know to transition from the old SAGE Labs to the new SAGE (Labs) Starbased.

Starbased – The Missing Manual
Contents
If you are new to SAGE (Labs), then this guide may not yet be for you. This guide will not fully explain how the game works. Instead, it focuses (for now) primarily on the new elements that can be found in Starbased, as compared to the previous version of SAGE Labs.
This guide includes the following chapters:
- Quick Overview of the Changes
- Priority Fees
- Loyalty Points
- Upgrading Starbases
- Crew Needed
- Starting an Upgrade
- Monitoring & Completing an Upgrade
- Collective Efforts
- Redundant Contributions
- Starting & Finalizing Tier Upgrades
- Upgrade Costs
- Loyalty Points
- Upkeeping Starbases
- Maintaining a Starbase
- Upkeep Numbers
- Loyalty Points
- Redundant Token Accounts
- Crafting
- Component Crafting
- Ship Crafting
- Meta Crafting Station
- Earning Atlas
- Epochs
- Fixed Emissions
- Acquiring Atlas
- Calculating your Atlas Reward
- Redeeming your Atlas Rewards
- Experience Points & Licenses
- Licenses
- Council Rank
- License Progression
- Scanning
- Information Density
- Number of SDUs per Scan
- Data Runners
- ATLAS Prime
- ATLAS Vault
- SOL Vault
- Hot Wallet – Auto-signing Transactions
- Frequently Asked Questions
1. Quick Overview of the Changes
The previous SAGE Labs version offered three different game interfaces: V1, V2, and the 3D version. SAGE Starbased (still a SAGE Labs game) comes with only one interface, which is an evolution of the aforementioned V2 interface.
Access SAGE Starbased here: based.staratlas.com
The biggest changes in a nutshell:
- Starbases are no longer Tier 5. All of them (except the CSS) have been reduced to Tier 1. The core objective in Starbased is to upgrade those bases to Tier 5.
- Helping your faction upgrade those starbases will earn you Loyalty Points. Don’t mistake this for reputation because you will be spending these points!
- For the first time, actual player progression will be stored on-chain in the form of Experience Points (XP). Though these don’t come with tangible effects right now, in the future, you will have a headstart when actual License & Player levels will be introduced.
- All redemption recipes have been removed. You can, at launch, use your resources, materials, and components for one thing only: contributing to your faction’s efforts
- Yes, this includes Council RFRs. Atlas has to be earned through accumulating and spending Loyalty Points from now on (see next section)
- 3 new resources have been added to the map: Titanium, Silica, and Nitrogen.
- 5 new recipes have been added that incorporate these new resources
- The map has slightly changed, and not just to incorporate the new resources.
- Scanning requires Food now, instead of Toolkits
2. Priority Fees
You may be aware that Solana is quite congested at the moment. If you experience many failed transactions, this is likely the reason. It is, therefore, important to ensure you are sending a small priority fee along with some, if not most, of your on-chain transactions. Some wallets can do this automatically for you (such as Phantom), but they are often too aggressive (spending more than necessary). The best way to do it is to let SAGE take care of this instead.
To do so, you must enable it in SAGE’s Settings. Click the cogwheel in the upper right corner of the screen to open the SAGE Labs—Settings.
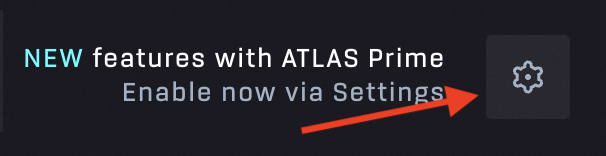
SAGE Labs – Open Settings
Among the options presented, the one at the bottom reads Priority Fees. If it is Inactive, click Manage Section Settings to configure the settings. At the bottom, you will find the Priority Fees setting:
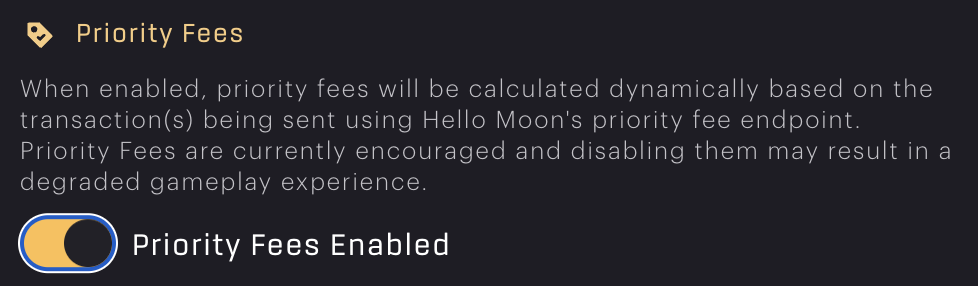
SAGE – Priority Fees toggle
Enable it, and hopefully, your transaction success ratio will increase!
3. Loyalty Points
Starbased will introduce a new currency of sorts: Loyalty Points (LP). These points are stored on-chain but not represented by a token. As such, you won’t see them show up in your wallet, and you won’t be able to trade them with others. These points are soulbound, which means they are tied to your PlayerProfile and can not go anywhere else.
The goal of Starbased is to help your faction strengthen its hold on its territory. You do this primarily by upgrading the 16 Starbases under your faction’s control (besides their CSS). In addition, primarily because it is required to perform these upgrades, you will be tasked with maintaining those same starbases, as well as the Central Space Station (CSS).
Your faction, in return, will reward you with Loyalty Points. These LPs can be used, at launch, for one thing, and one thing only: to acquire a slice of your faction’s steady flow of Atlas emissions.
In other words, in order to earn Atlas, you will first have to earn LP. There are two ways to do this:
- Supply material and crew to help upgrade a Starbase (within your faction’s borders)
- Supply Food and/or Toolkits to any one of the Starbases (within your faction’s borders)
Before going into the actual earnings, let’s look closer at these two new core gameplay loops!
4. Upgrading Starbases
Each Starbase that is not at max Tier will offer several Upgrade projects (aka Effort) to the players. When all efforts have been completed, any player can hit the button and upgrade the Starbase to the next Tier.
Each Faction’s Central Space Station is at Tier 6, which is its maximum. This means there are no Upgrade projects available here, and there will never be.
Every other Starbase starts out at Tier 1 and can be upgraded up to Tier 5, which is its maximum.
Every Tier of a Starbase comes with its own assortment of Upgrade projects. Tier 1 Starbases offer 5 different projects that must be completed before they can be upgraded to Tier 2. Tier comes with 6 projects that need to be completed instead, and each next Tier will add one more project.
Each new Starbase Tier comes with Upgrade projects that require the exact same components as those of the previous tier, plus an Upgrade project for one additional new component. However, each upgrade will come with higher component demands.
Crew Needed
It’s not enough to just contribute components. Someone is going to have to use these to do the actual construction work. And, you guessed it, this is you! Or rather, it’s your crew. Whenever you supply components, you will also have to supply a number of crewmembers. In this sense (and in many more), this process behaves a lot like a regular crafting process.
Your contributions won’t register as complete before all the components you supplied have been used up in the Upgrade process. Again, like with regular crafting, the more crew you supply, the faster you’ll complete your contribution to the upgrade project.
Of course, you will get the crew back once your work is completed. On the other hand, the components supplied will be gone forever.
Starting an Upgrade
First, select the Operations option in the Starbase Controls for one of your Faction’s Starbases (one for where you have the right components and crew available). The first tab in the dialog that pops up, Base Management, is exactly where you need to be. At the top of the tab, you will see the Starbase Maintenance and Upkeep section. Right below it, you will find the Starbase Upgrade / Staging Area. This contains the Starbase’s Upgrade projects.
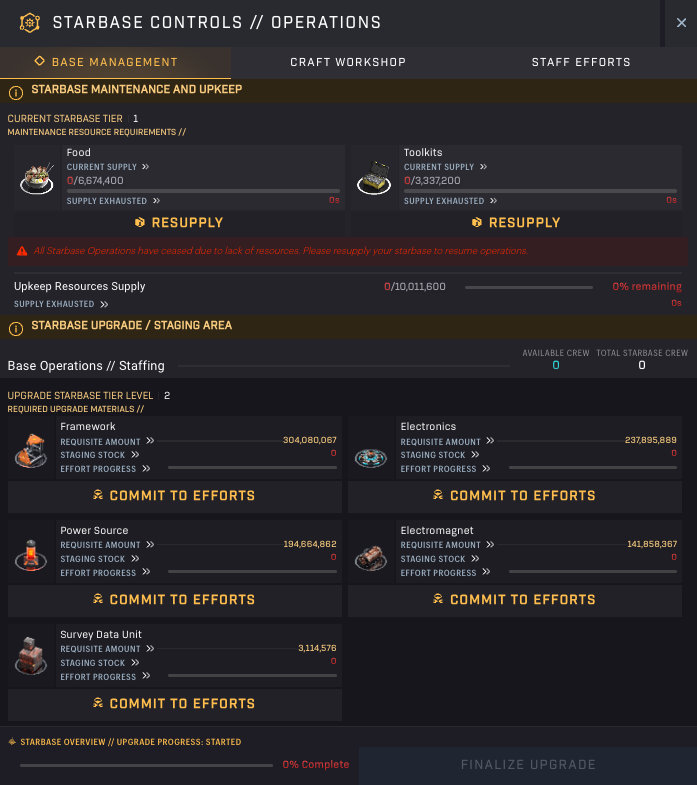
Starbased – A pristine Tier 1 Starbase
The top line, Base Staffing, lists the number of crew members you have available at the station and how many of them are available for work. Directly below are the various Upgrade projects to which you could contribute. Some may have already been completed, which will be clearly marked, making it impossible to commit efforts to that project.
A Tier 1 Starbase offers 5 different projects you can contribute to by supplying resources and lending out crewmembers. Choose the one you wish to contribute to and select Commit to Efforts.

Starbased – Upgrade Project: Frameworks [note LP reward here is wrong!]
In the following screen, you can input the number of components you wish to supply and select the number of crewmembers you wish to lend out. At the bottom, you can see how much LP this contribution will reward you after your crew has completed their part of the upgrade.
When you return to the previous screen, Base Management, you won’t see a change in the Effort Progress indicator for the component you provided. This is not an error; this is because only completed work is registered there.
Monitoring & Completing an Upgrade
After you have supplied some components and crew to an Upgrade project, you can track your crew’s progress through the Staff Efforts tab (the third one at the top) of the Operations dialog. You’ll have to select the second internal tab to access the Staff Upgrade Projects.
Here, you will see a list of your Upgrade efforts underway, along with a timer counting down to completion.
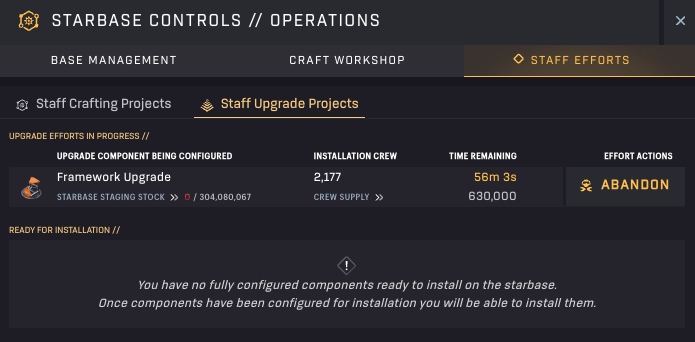
Starbased – Upgrade Effort (Ongoing)
If you abandon the effort, you will get your materials and crew back right away. However, you will not have contributed, so there will be no LP reward!
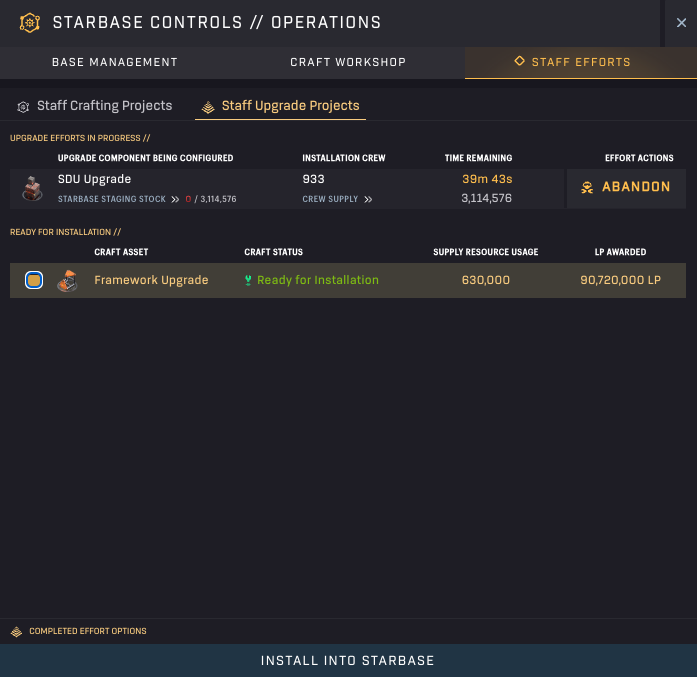
Starbased – Upgrade Efforts (Completion)
If, instead, you wait until your efforts have been installed, you will see a line pop up in the Ready for Installation section. Selecting the line and clicking the Install into Starbase button at the bottom of the popup will return your crewmembers and collect your LP reward!
Collective Efforts
Neither the Upgrade projects nor the Upkeep efforts are solo endeavors. Other players are contributing to the very same projects, which is why you will see their progress jump up occasionally.
Once a specific Upgrade project has been completed, additional components of the required type can no longer be used to upgrade that Starbase. At least, not while there are other Upgrade projects remaining that have not yet been completed.
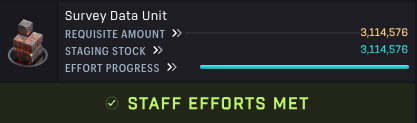
Starbased – Upgrade Efforts Met
Redundant Contributions
Considering all of the above, you may have noticed an issue. Because your contributions are not taken into account until your crew has finished their work, that specific project will remain open for others to contribute to, even when your contribution would complete the project.
The game has to take into account that you may choose to abandon your effort.
How is this handled? Well, once a contribution is finished and claimed (installed), if it’s enough to finish the project, all is well, and it’s handled as normal. If there is a surplus (because someone else made a smaller contribution that finished earlier), you’ll get the surplus refunded, and you will only get LP for the number of components that were required.
If your entire contribution is redundant because the project has already been completed, you will see this right away in the interface with a Reclaim button. That button will refund your components and you will not gain any LP for the time spent.
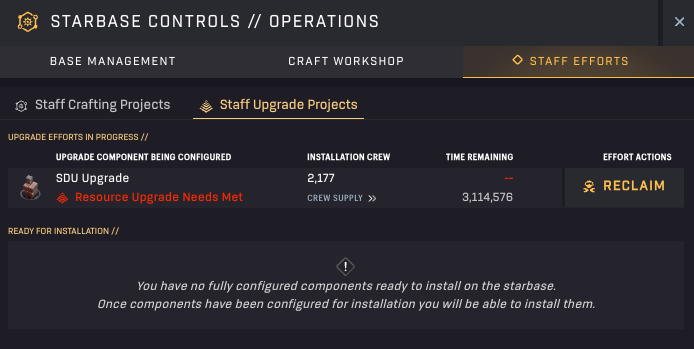
Starbased – Upgrade Effort (Redundant)
This means that towards the end of a specific project, it could make sense for you to make smaller contributions with your full crew available to ensure it is completed faster.
Starting & Finalizing Tier Upgrades
When you are the first person who wants to Upgrade a Starbase to the next Tier, there is one initial step you’ll need to perform. You will notice no Upgrade projects are shown because they have not been created on-chain. Someone will have to do that first, and that someone is you.
The process is simple. Just click the Start Upgrade (Tier X) button in the dialog’s bottom right corner. The Upgrade projects will appear almost immediately after.
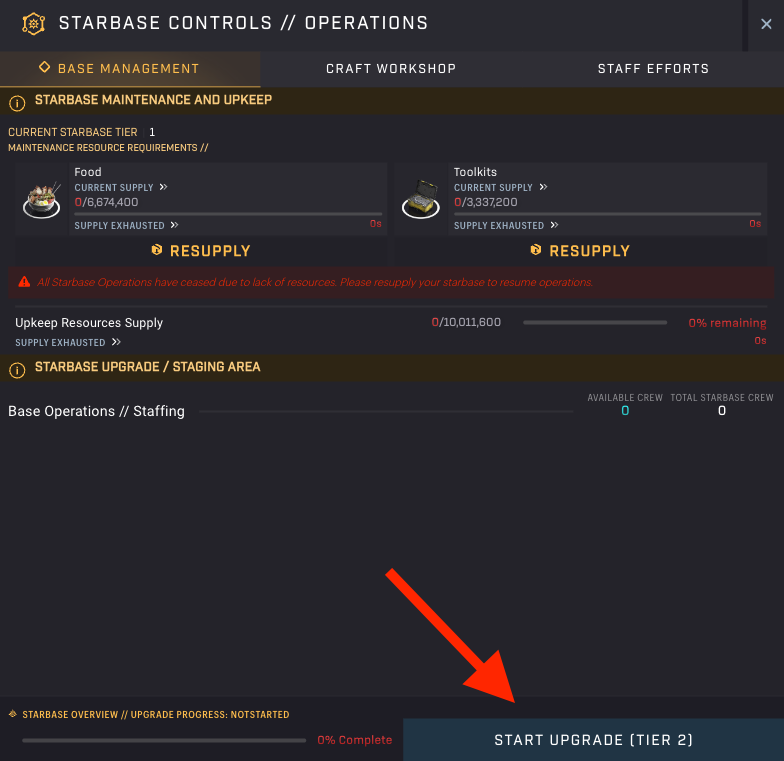
Starbased – Kickstarting the upgrade process to the next Tier
When all Upgrade projects have been completed, the Finalize button will be enabled (that was always lurking in the bottom right corner). Someone will have to click it to set the actual upgrade in motion. When you do, the Starbase will level up on-chain, and, provided the max tier was not reached, the next Tier upgrade can be started.
Upgrade Costs
Below are a few tables that list the exact Upgrade mission requirements:
| Component | Amount Required | Time cost (1 crew/1 component) |
|---|---|---|
| Framework | 304,080,067 | 12s |
| Electronics | 237,895,889 | 14s |
| Power Source | 194,664,862 | 15s |
| Electromagnet | 141,858,367 | 16s |
| SDU | 3,114,576_*_ | 1s |
Tier 1 to Tier 2
*) This number should have been higher after the SDU mechanic overhaul, but was left unchanged as people had already begun making progress. This explains the big step up from Tier 1 to Tier 2.
| Component | Amount Required | Time cost (1 crew/1 component) |
|---|---|---|
| Framework | 353,200,695 | 12s |
| Electronics | 276,325,227 | 14s |
| Power Source | 226,110,726 | 15s |
| Electromagnet | 164,773,950 | 16s |
| Field Stabilizer | 105,484,384 | 24s |
| SDU | 20,081,472 | 1s |
Tier 2 to Tier 3
| Component | Amount Required | Time cost (1 crew/1 component) |
|---|---|---|
| Framework | 419,322,834 | 12s |
| Electronics | 328,055,632 | 14s |
| Power Source | 268,440,554 | 15s |
| Electromagnet | 195,621,019 | 16s |
| Field Stabilizer | 125,231,947 | 24s |
| Radiation Absorber | 91,260,432 | 48s |
| SDU | 23,840,893 | 1s |
Tier 3 to Tier 4
| Component | Amount Required | Time cost (1 crew/1 component) |
|---|---|---|
| Framework | 496,809,602 | 12s |
| Electronics | 388,677,111 | 14s |
| Power Source | 318,045,749 | 15s |
| Electromagnet | 231,769,874 | 16s |
| Field Stabilizer | 148,373,588 | 24s |
| Radiation Absorber | 108,124,470 | 48s |
| Particle Accelerator | 84,590,770 | 96s |
| SDU | 28,246,457 | 1s |
Tier 4 to Tier 5
Loyalty Points
Loyalty Points can be retrieved after your crew completes their upgrade work in the Staff Efforts tab of the Operations dialog.
The amount of Loyalty Points you get for contributing to an Upgrade effort depends on the component you are supplying. It does not depend on the number of players contributing to the same Upgrade project during an epoch, nor does it matter if it is a Tier 1 Starbase you are upgrading or a Tier 3. Lastly, it does not matter which faction you are in. The LP reward for a specific component is constant. Below is a table showing the amount of LP you can earn with each contribution.
| Component | Loyalty Points/component |
|---|---|
| Framework | 48 |
| Electronics | 76 |
| Power Source | 108 |
| Electromagnet | 135 |
| Field Stabilizer | 255 |
| Radiation Absorber | 325 |
| Particle Accelerator | 480 |
| SDU | 1100 |
Loyalty points earned through Upgrading
5. Upkeeping Starbases
Each Starbase that is not at its max Tier will offer two different Upkeep missions: One to supply it with Food and another to supply it with Toolkits.
- Toolkits: Upgrade efforts will pause when a Starbase runs out of Toolkits. This means that all players’ upgrade efforts will stand still and will be unable to be completed until more Toolkits have been supplied.
- Food: Crafting processes will pause when a Starbase has run out of Food. Like the above, crafting processes will resume once more Food has been supplied.
If a Starbase is at max Tier, only the Food mission remains. The reason for this is simple: Toolkits are required to ensure Starbase Upgrade missions continue uninterrupted. But if a Starbase is at max Tier, it can not be upgraded anymore, so there is no need to supply Toolkits as Upkeep.
This is why the CSS also only has one Upkeep mission (Food), as it is already at max Tier (6, in that special case).
Maintaining a Starbase
First, select the Operations option in the Starbase Controls for one of your Faction’s Starbases (one where you have Food/Toolkits stored). At the top of the dialog that pops up, you will see the Starbase Maintenance and Upkeep section within the Base Management tab. This section lists the available upkeep processes for this specific Starbase.
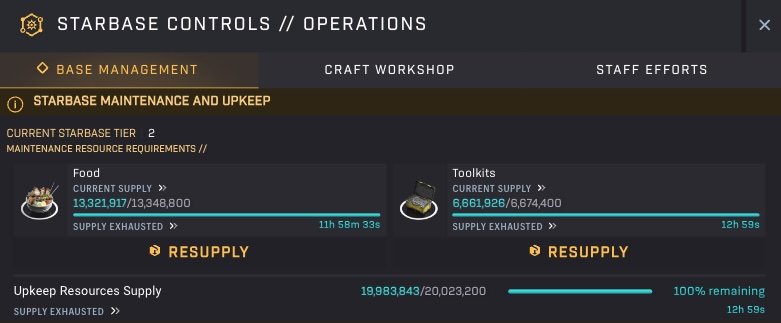
Starbased – Upkeep
Unlike Upgrade processes, no crew is required to maintain a starbase. As long as the bar associated with a Resource Requirement is not empty, the related processes will keep functioning. In other words, it’s not necessary to completely fill it up, though you are free to do so, of course.
If you want to contribute, click the Resupply button to add Food or Toolkits to the Starbase’s reserve.
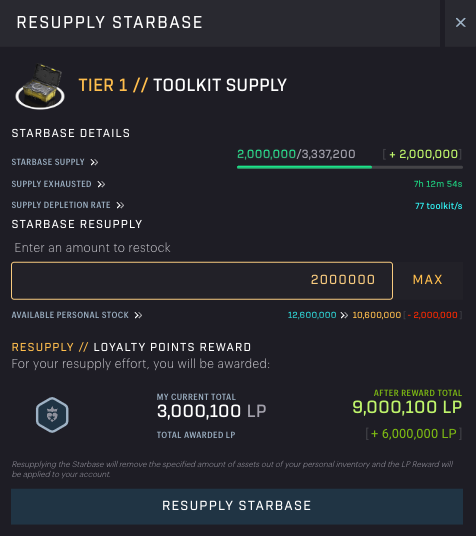
Starbased – Resupplying Toolkits
In the following dialog, you will be able to input the number of Food/Toolkits you wish to contribute. Unlike Upgrade processes, you will get LP awarded instantly the instant you hit the Resupply Starbase button. There are no processes that need to be completed first.
Above the input box, you can see at a glance how fast the Starbase burns through this specific resource (Supply depletion rate) and how long it will take before the current supply is exhausted (Supply Exhausted).
Note that you can’t add more of a resource above its maximum supply.
Below the input, the dialog shows your current LP total (left) and the amount after resupplying (right, in light green). Beneath this new potential total, you can find the amount of LP added specifically for the current inputted contribution. Simply click the Resupply Starbase button to effectuate your contribution.
Upkeep Numbers
Below, you can find tables for each of the different Tiers of Starbases with their Food and Tookit burn rate (depletion rate in seconds) and the maximum storage capacity they have available for the resource (max reserve).
| Resource | Max reserve | Depletion rate/s |
|---|---|---|
| Food | 4,449,600 | 103 |
| Toolkits | 3,337,200 | 77 |
Tier 1 – Upkeep
| Resource | Max reserve | Depletion rate/s |
|---|---|---|
| Food | 6,674,400 | 154 |
| Toolkits | 5,005,800 | 116 |
Tier 2 – Upkeep
| Resource | Max reserve | Depletion rate/s |
|---|---|---|
| Food | 8,899,200 | 206 |
| Toolkits | 6,674,400 | 154 |
Tier 3 – Upkeep
| Resource | Max reserve | Depletion rate/s |
|---|---|---|
| Food | 11,124,000 | 258 |
| Toolkits | 8,343,000 | 193 |
Tier 4 – Upkeep
| Resource | Max reserve | Depletion rate/s |
|---|---|---|
| Food | 13,348,800 | 309 |
Tier 5 – Upkeep
| Resource | Max reserve | Depletion rate/s |
|---|---|---|
| Food | 15,573,600 | 361 |
Tier 6 – Upkeep
Note: The maximum reserve size divided by the depletion rate is a little over 12 hours for each of the resources and tiers.
Loyalty Points
Loyalty Points are earned immediately upon supplying either Food or Toolkits. Below is the number of LP earned for a single Food or Toolkit:
| Resource | **Loyalty Points/Resource |
|---|---|
| Food | 6 |
| Toolkits | 14 |
Loyalty Points earned through Upkeeping
Redundant Token Accounts
Every now and then, you could run into redundant token accounts while trying to contribute, such as when trying to provide Toolkits for a Starbases’ Upkeep.
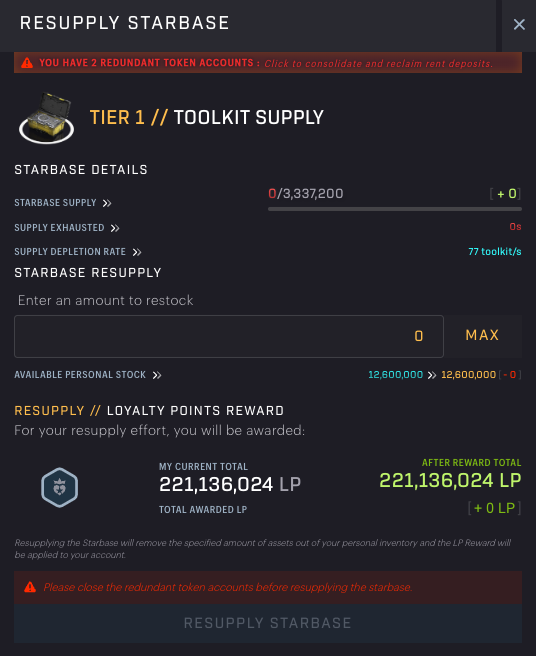
Starbased – Redundant Token Accounts
Here, the dialog will not allow you to click the Resupply button until you close your redundant token accounts. You can easily do this by clicking the red banner at the top of the dialog.
Redundant token accounts are nothing to be concerned about. During your adventures, some token accounts fail to close for whatever reason. It’s not a reason to halt your game, but at some point, it’s best to clear them up.
Sometimes, clicking the banner once is not enough. In that case you’ll likely have to click it again to get rid of any remaining accounts.
After this has been resolved, you can continue supplying your resources!
6. Crafting
There are a great number of items that can be crafted at the various Starbases. Most important are the various compounds and components required to upgrade Starbases. All components can be crafted at your Faction’s CSS, though the Food costs can be substantial there.
Other Starbases offer crafting recipes as well, but a more limited set. Upgrading them to higher Tiers will expand the number of recipes offered.
To get crafting, select the Operations option in the Starbase Controls for one of your Faction’s Starbases. At the top of the dialog that pops up, click the Craft Workshop tab. This will right away bring you to the Standard Crafting Recipes sub-panel. On the left-hand side, you can view all the unlocked recipes this Starbase offers.
Component Crafting
Below you can find the full overview of all Component/Compound Crafting Recipes and the Starbase Tier required to unlock them!
Tier 1:
- Copper
- Electronics (needed for upgrade to T2+)
- Food
- Framework 1 (needed for upgrade to T2+)
- Fuel
- Graphene
- Hydrocarbon
- Iron
- Polymer
- Power Source (needed for upgrade to T2+)
Tier 2:
- Ammunition
- Copper Wire
- Electromagnet (needed for upgrade to T2+)
- Magnet
- Toolkit 1
Tier 3:
- Aerogel
- Crystal Lattice 1
- Crystal Lattice 2
- Crystal Lattice 3
- Field Stabilizer (needed for upgrade to T3+)
- Framework 2
- Steel
- Toolkit 2
Tier 4:
- Energy Substrate
- Framework 3
- Radiation Absorber (needed for upgrade to T4+)
- Titanium
- Toolkit 3
Tier 5:
- Particle Accelerator (needed for upgrade to T5)
- Strange Emitter
- Super Conductor
Besides components and compounds, there are other items that can be crafted, but only at the CSS, such as ships and meta items from 3rd party projects.
Ship Crafting
Before Starebased was launched, the team had introduced Ship Redemption to SAGE Labs previously, allowing players to exchange an assortment of components and SDUs for one of several Star Atlas ships. When Starbased released this feature was not present, but it has been re-added since!
However, the new Starbased variant works a little differently. Instead of an instant swap, the ship will need to be crafted, which takes crew members (note: more crew does not speed up crafting a single ship; one is enough) and costs time. In that sense, it feels more like crafting, and that is exactly where this option can be found: At the Faction’s CSS, as part of the Craft Workshop in the _Standard Crafting Recipes_that Starbase’s Operations dialog.
In Starbased, only two ships can be crafted, the Calico Maxhog and the Fimbul Mamba EX. These are the two ships that the team does not plan on selling to players directly. Instead, the plan is to offer them through gameplay only, such as this crafting mechanic in Starbased.
Below we inserted the recipes for both ships. They clearly list Tier 6 as their requirements, which means these are only available at the Central Space Station of your Faction.
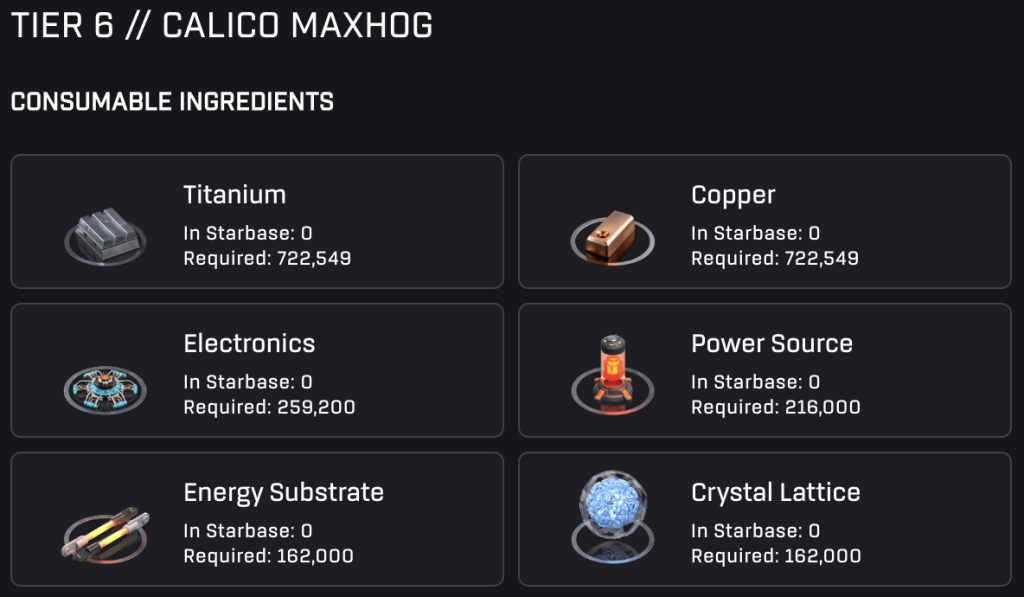
Starbased – Calico Maxhog Recipe
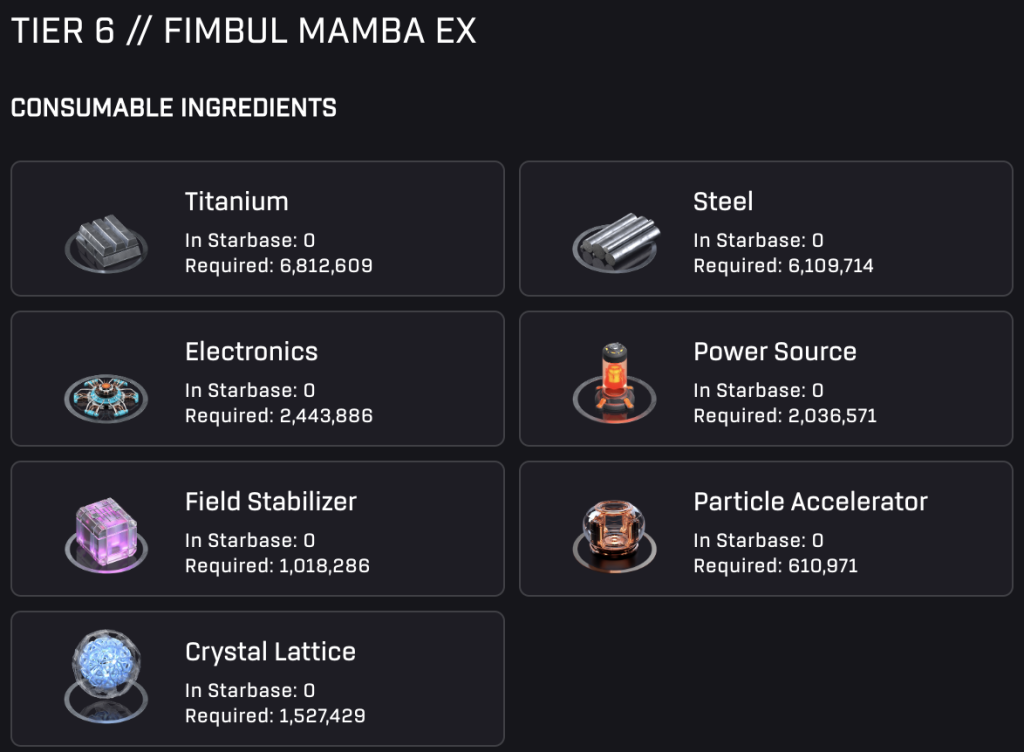
Starbased – Fimbul Mamba EX Recipe
Meta Crafting Station
The CSS comes with a special crafting station dubbed the Meta Crafting Station. Here, you can craft items that exist outside the official Star Atlas ecosystem and are instead owned by 3rd parties.
At launch, the only available option was The Edge of Paradise, a limited edition poster created by the SuperphoenixDAO.
You can access this by selecting the Operations option in the Starbase Controls for your Faction’s CSS. Then click the Craft Workshop at the top. You will start at the Standard Crafting Recipes (secondary) tab, but next to it, you will see the new Meta Crafting Recipes option. Click it to access the new Meta Crafting Station.
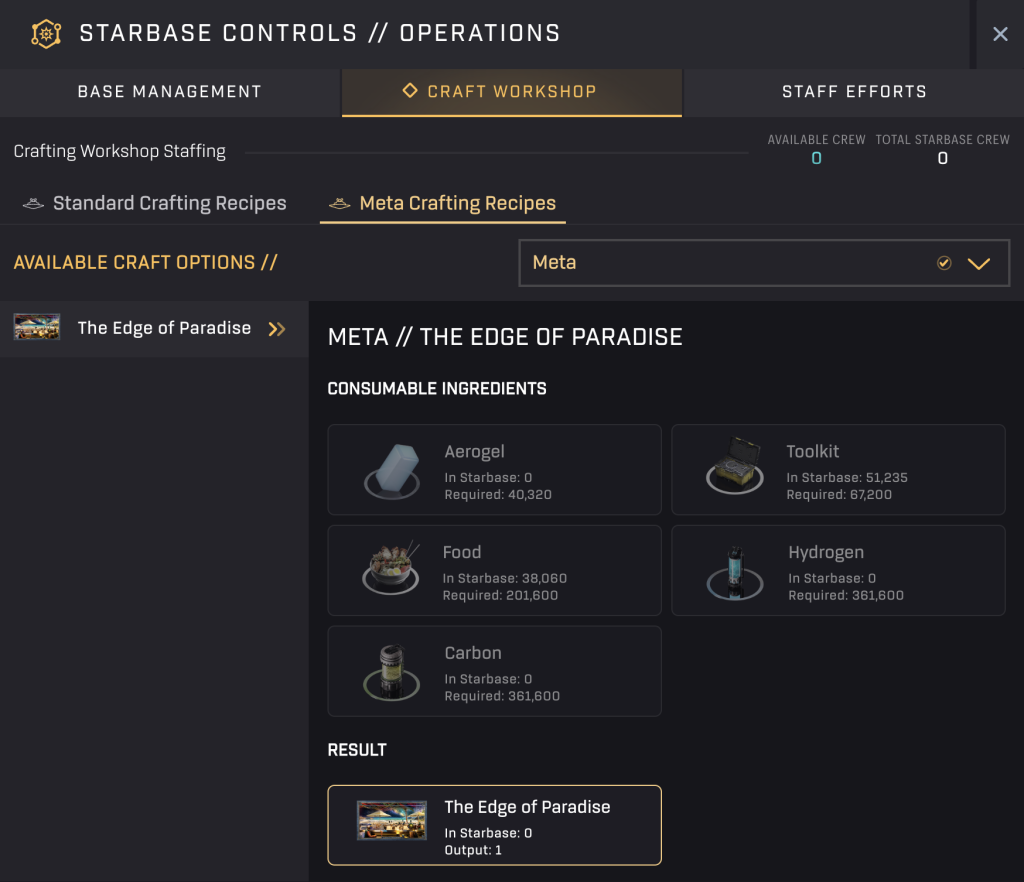
Starbased – Meta Crafting Station
Note that you need at least one crew member to craft a meta crafting recipe.
7. Earning Atlas
In Starbased, Atlas rewards are based on the LP you earned during the previous epoch (day). Before getting into this, let’s first cover some of the new mechanics that play a role here.
Epochs
From an economic perspective, Starbased gameplay is split into an infinite number of consecutive, fixed-length windows of time, called epochs. All epochs have the exact same duration, and whenever one ends, another one will start. Every action a player performs occurs during one such epoch.
For the launch of Starbased, the team has set the length of a single epoch to 24 hours. To make things easy for the player base, an epoch currently starts and ends with a day in the (fictional) UTC timezone, which means a new epoch starts at 0:00 (12 AM) UTC every day.
This means that at launch, players on the US East Coast will see this happen at 8 PM, whereas for most of Western Europe, this will happen at 2 AM (02:00) instead.
Fixed Emissions
We’ve written in more depth about Atlas emissions in our long-form article “A New Economic Paradigm“, but we’ll give you the short version here.
At the end of every 24-hour epoch, the team emits 6 million Atlas as in-game rewards to Starbased Players. This Atlas will, in its entirety, be dropped to the players who spent their LP to acquire Atlas during that same epoch (more on this later). [Note that this previously was 4.5 million, but the team since updated this].
But there is more to it. The 6 million daily Atlas emission is actually split into three equal-sized portions of 2 million. Each portion has been earmarked for one of the three player factions: MUD, ONI, and Ustur. Instead of 6 million Atlas, it’s really these three 2 million Atlas pools that will be distributed to players. To be precise, 2 million Atlas will be distributed to each faction after an epoch ends, specifically to the players within that faction who actually spent LP to purchase Atlas (that epoch).
This has consequences, which we’ll get into in a bit.
Dynamic Bonus Emissions
To make it more interesting to update Starbases, the team has also introduced a new bonus Atlas emissions [May 25th, 2024]. These are based on the current Tiers of a Faction’s Starbases. The higher the Tier, the more bonus Atlas is added to the Faction’s rewards at the end of each epoch.
Tier 1 Starbases provide no bonus at all, but Tier 2+ Starbases now grant an additional Atlas emission bonus. Each Tier 2 Starbase adds another 7000 Atlas to that Faction’s reward. And Higher Tier Starbases yield even bigger bonuses!
This bonus Atlas comes on top of the 2 million that is earmarked for a Faction per epoch.
Here is the full list of bonuses per Tier:
| Tier | Bonus ATLAS |
|---|---|
| 1 | 0 |
| 2 | 7 000 |
| 3 | 14 500 |
| 4 | 22 500 |
| 5 | 31 250 |
SAGE – Bonus ATLAS per Starbase Tier
Acquiring Atlas
When Starbased was released, Atlas rewards had to be claimed manually. It had to be bought with LP at your faction’s Central Space Station. This is no longer the case! Now, Atlas will be handed out automatically when an epoch ends, based on the LP earned during the previous epoch.
Calculating your Atlas Reward
The amount of Atlas emitted is fixed and constant for each faction and each epoch. The team made that work by rewarding each LP spent with a different amount of Atlas from epoch to epoch (day to day).
At the end of each epoch, for each faction, a program calculates the total amount of LP spent by its players. Then, it divides the 2 million Atlas by that number to get to the amount of Atlas that a single LP is worth during the (now) past epoch.
This clarifies why the team has to wait until an epoch has ended. Only then is it possible to summarize each player’s spent LP and do the math to calculate the Atlas reward per LP for the past epoch.
Your reward will simply be the amount of LPs you spent times the Atlas/LP number they calculated.
Redeeming your Atlas Rewards
Your Atlas rewards won’t be airdropped to you automatically. You can claim your Atlas sometime after an epoch has ended by navigating to the second tab of the LP Exchange screen: Redeemable Atlas Claims.
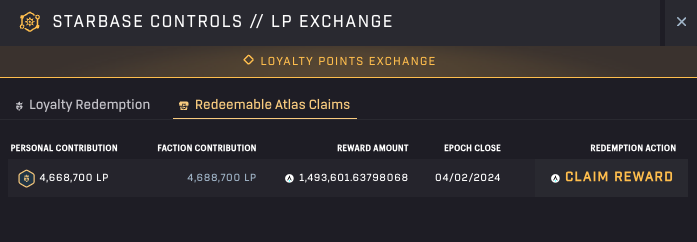
Starbased – LP Exchange – Atlas Claim
This interface will show you a list of all your pending claims (one per epoch). For each of these, your LP contribution is shown, along with the contribution of your entire faction. This means you can always do the math yourself and see if it checks out. Hit the Claim Reward button to collect your Atlas!
8. Experience Points & Licenses
You can Experience Points (XP) for almost any activity you perform in SAGE. Like Loyalty Points, XP will be locked to your account. Unlike LP, you can’t spend it. It will forever remain locked to the account and can only be accumulated.
This XP is often referred to as Council Rank XP, character XP, or account XP.
There is an XP ceiling in place. This means that each account can only earn up to a maximum amount of XP per day. This limit has been set to 40k/epoch (day).
This levels the XP progression path somewhat for all players, ensuring whales do not blow through the Council Rank levels (aka _playe_r levels) in a matter of days. Players with decently sized fleets should be able to hit the cap relatively easily.
Licenses
We can’t really talk about XP without first talking about the Licenses.
There are 4 licenses active in Starbased, but, as we pointed out in our Career Guide, these are not yet the full-fledged licenses we’ll get later. These only serve to accumulate your license-specific experience points for now.
The 4 licenses are:
- Pilot – Gain License XP by moving your fleets around and transporting goods
- Data Running – Gain License XP by scanning
- Mining – Gain License XP by mining
- Crafting – Gain License XP by crafting
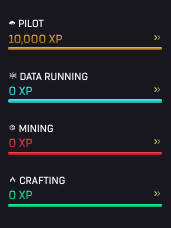
Starbased – Licenses
Here is the important bit: License progression feeds directly into your Council Rank XP. It is through the license progression that you really earn XP. In other words, if you are not performing an activity that earns you XP for a specific License, you are not earning XP.
The amount of XP you can gain per epoch for a single License is also limited. That limit is 10K License XP/day.
This daily License XP ceiling is directly responsible for your Council Rank XP ceiling. When you hit max daily XP on a license, that activity will stop adding Council Rank XP as well. This means that in order to get the full 40K XP for your account, you have to dabble in all four activities! You can not just focus on one and keep going.
Note: Due to a bug on launch day, it was possible to keep earning Council Rank XP despite maxing out the related License. This was fixed the following day.
You can find your License progression by clicking the Licenses drop-down right beneath your XP and LP counters at the top right of the Starbased interface.
Council Rank
Through account XP, you will be able to attain new Council Rank levels in the future. A key feature of these levels is that each awards the player a specific number of points they can invest into upgrading certain parts (of their choosing) of their account. For example, they could choose to bring in bigger ships, bigger fleets, more fleets, etc. See the SAGE Manual for an overview of this.
Though these levels, perks & restrictions won’t yet be live in Starbased, you will start earning XP right away (Michael calls this “pre-leveling your character”). This will allow players to be less bothered by the restrictions when they go live with this mechanic will go live, which will happen when combat is added to SAGE.
License Progression
Different activities related to a specific license can yield different amounts of XP. Note that Faction Contributions do not yield XP for any of the licenses! However, you would gain the XP by performing the mining, scanning, and crafting of the resources required to make these contributions.
- Pilot License – XP is earned for sub-warping, warping (and other actions in-game?)
- Mining License – XP is earned when you Harvest the resource and stop mining.
- Crafting License – XP is earned when you Claim your crafted resources
- Scanning License – XP is earned whenever you perform a Scan
Pilot License
Movement is the way to get Pilot License XP. It does not matter if you are freighting resources or just idly flying around.
| Ship (single) | Size Class | Subwarp XP/square | Warp XP/square |
|---|---|---|---|
| Fimbul Airbike | XXS | 5 | 15 |
| Pearce X5 | XS | 10 | 30 |
| Rainbow Chi | S | 15 | 45 |
| VZUS opod | M | 20 | 60 |
Example XP for Movement
Mining License
Mining harder resources will yield a higher amount of XP.
| Ship (single) | Resource | Location | XP |
|---|---|---|---|
| Armstrong IMP Tip | Hydrogen | CSS | 310 |
Example XP for Mining
Crafting License
When Crafting, the longer it takes to craft something, the more complex the recipe, or the higher the tier of the input materials, the more Crafting XP that recipe will yield.
An example of this can be seen with the three different Framework recipes in Starbased. All three recipes yield the same output: a single Framework. However, you’ll earn more XP using the Framework 3 recipe than with Framework 1. And, as you’ve no doubt guessed, Framework 2 XP lies between these two.
Scanning License
(We hope to get some more data on scanning XP soon)
| Ship (single) | Failed Scan XP | Successful scan XP |
|---|---|---|
| VZUS opod | 2 | 200 |
Example XP for Scanning
Once more specific metrics become known, we will add additional data to this guide.
9. Scanning
The Scanning mechanic has been extensively adjusted. Besides it now needing Food instead of Toolkits, there are three new stats in the official Ship Stats spreadsheet that play a role here:
- SDU/Scan — This tells you the maximum number of SDUs retrieved by that ship on a successful scan. This number is added up for every ship in a fleet when it scans.
- Food/Scan — This is the amount of Food burned per scan, regardless of whether it was successful or not. This number is added up for every ship in a fleet when it scans.
- Scan Cooldown — The number of seconds you’ll have to wait before being able to perform another scan. The maximum cooldown within a fleet is applied to the whole fleet when scanning.
Information Density
A brand new sector stat called Information Density determines whether or not your scan is successful and, if so, how many SDUs you will really find.
This Information Density, represented as a percentage, is a value (between 0% and 100%) that evolves over time based on both a “noise” function and will also go down whenever a successful scan takes place in that sector. Every sector has its own Information Density (ID) value. This value affects two things:
- The chance of you finding any SDUs at all. The ID percentage represents your chance of performing a successful scan.
- The maximum amount of SDUs found upon a successful scan. The maximum amount of SDUs available in a sector equals the ID multiplied by 10. This means that an ID of 1% means there are 10 SDUs available, and 20% means there are 200.
Note: As the maximum value of the Information Density is 100%, the maximum amount of SDUs that can be retrieved in a single successful scan equals 1000. This may be more of a theoretical maximum, however, as ID values higher than 70% have not yet been seen.
Number of SDUs per Scan
From the above it is clear that both the Information Density and the SDU/Scan ship stat determine the actual amount of SDUs found per successful scan. Let’s look at a few examples:
Example 1:
- SDU/Scan stat: 36
- Information Density: 10%
- Amount of SDUs found on a successful scan: 36
An ID of 10% means there are 100 SDUs available. This means that the SDU/Scan stat is the limiting factor here (which is the optimal scenario). The fleet will collect the maximum amount possible.
Example 2:
- SDU/Scan stat: 360
- Information Density: 10%
- Amount of SDUs found on a successful scan: 100
An ID of 10% means there are 100 SDUs available. Even though the SDU/Scan stat is now 360, there are no more than 100 SDUs available. The ID % is the limiting factor here, which is clearly not optimal. This demonstrates right away that creating a big scanning fleet that can collect a lot of SDUs per scan may not be the best strategy.
Data Runners
Data Runners are the best ships for scanning, period! Not only do they have a significant bonus to their SDU/scan stat, making them the best at scanning in their respective size class, but they can also scan without burning Food! Lastly, their Scan Cooldown is among the lowest for this size class as well.
There are at present 3 Data Runner ships:
| Ship | Size | SDU/Scan | Cooldown |
|---|---|---|---|
| Opal Rayfam | S | 20.17 | 104s |
| VZUS opod | M | 63.06 | 100s |
| Fimbul BYOS Ranger | M | 63.06 | 100s |
10. ATLAS Prime
ATLAS Prime allows transaction fees to be paid for in ATLAS instead of SOL, at least from your perspective, the user’s. In reality, the ATLAS equivalent, plus a small fee, goes to an account run by the team, and they are paying the SOL fee for you. This all happens within a single transaction, meaning you don’t see any of this. You only see you are paying ATLAS.
Activating ATLAS Prime requires two actions. The first is simple, you’ll need to activate it within the Settings. In the sidebar that opens, click on Manage Section Settings and toggle ATLAS Prime Enabled at the top of the dialog:
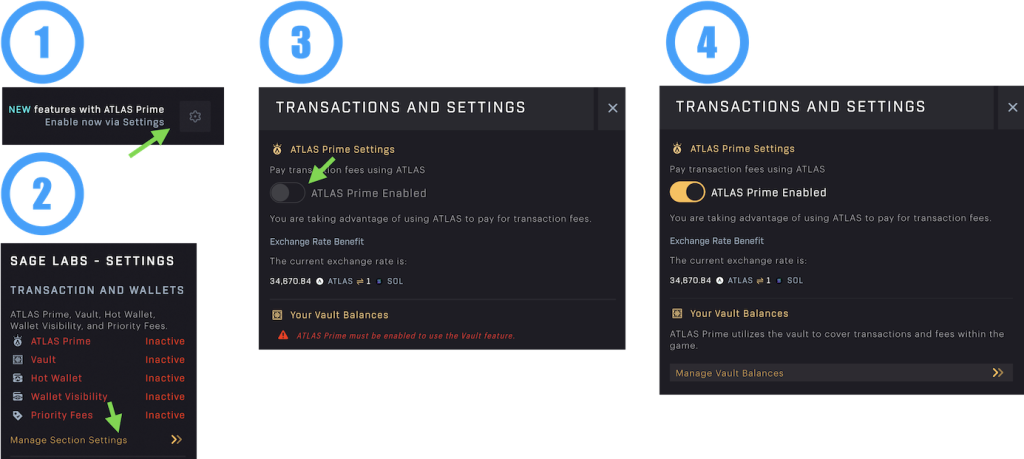
Starbased – Enabling ATLAS Prime
Note that afterward, ATLAS Prime will still be marked as Inactive. This is correct, as another step is needed: you’ll need to fund your ATLAS Vault.
ATLAS Vault
In order to activate ATLAS Prime, you will have to fund your ATLAS Vault. Unlike the old ATLAS Prime feature, ATLAS Prime no longer touches the ATLAS that is in your wallet. Instead, it only uses ATLAS, which you made available to it through the ATLAS Vault. This means that you will first have to move some of your ATLAS into that Vault before being able to use ATLAS Prime.
To do so, you’ll need to Manage Section Settings again and click the Manage Vault Balances option. Next up, you’ll need to create (initialize) the actual Vaults. No, this is not a typo. You are actually creating two vaults, an ATLAS Vault and a SOL Vault. More on the latter one below.
Now that the Vaults exist, you can fund the ATLAS Vault by entering a number in the input box near the bottom of the dialog, making sure it does not exceed the ATLAS available in your wallet (shown right above). Then click the Deposit button at the bottom of the dialog and sign the transaction.
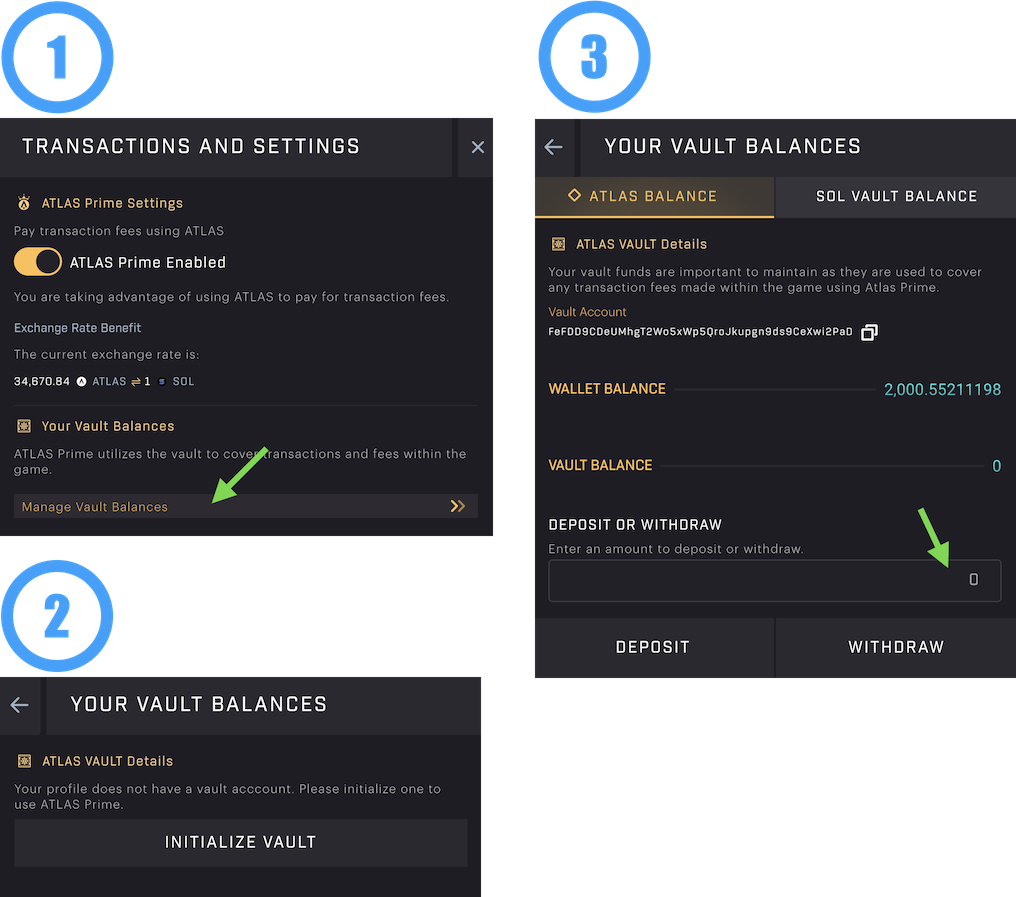
Starbased – Fund ATLAS Vault
Don’t be too shabby, or else you’ll have to add more funds again after a few minutes of gameplay. Of course, it’s also best not to fund it with a small fortune of ATLAS, either.
Obviously, when you want to stop using ATLAS Prime,
SOL Vault
In the introduction of this chapter, we mentioned paying a small fee for the ATLAS to SOL conversion. This additional fee is to ensure that the team won’t lose money on these conversions due to the price movement of ATLAS or SOL as the exchange is happening. Unfortunately, this results in ATLAS Prime being slightly more expensive to use.
The good news is that the team has remedied this a little since the early days of ATLAS Prime. Often, the highest fee cost within a transaction is the so-called rental deposit that needs to be paid for transactions where some data needs to be stored (e.g., fleet creation, new crafting jobs). You’ll get this fee back when that is no longer necessary (e.g., disbanding a fleet or claiming a crafting job). This fee is, of course, denominated in SOL. Back in the day, you would get this SOL back, and you would simply pay ATLAS again the next time a new rental deposit is required.
Nowadays, instead of giving you back this SOL, ATLAS Prime deposits this into the SOL Vault (which you already created in the previous step). Whenever you need to pay a new rental deposit, ATLAS Prime first checks the SOL Vault to see if it contains enough SOL. If it does, then it will use that instead.
This means that when SOL is available in the Vault, it will be used instead, forgoing the conversion of SOL to ATLAS, hence the fee for this conversion.
You can manually top up the amount of SOL available within the Vault to ensure SOL is always used, potentially saving you some money.
See the instructions above for funding the ATLAS Vault. Then, select the second tab, SOL Vault, to deposit or withdraw SOL to the Vault.
11. Hot Wallet – Auto-signing Transactions
The team finally got around to putting the PlayerProfile feature to good use! The first fruit of their labor is that you can now create a temporary Solana wallet in memory and give that wallet permission to interact with your ships in SAGE. Best of all, this wallet automatically signs every transaction (you have given it permission to) in the background.
All in all, this keeps your ships safely in your wallet (preferably a Ledger or hardware device, of course) while drastically reducing the interruptions you experience due to having to sign an on-chain transaction. This is a great feature that will improve your gameplay experience significantly!
To enable the new Hot Wallet feature, you must first activate ATLAS Prime if you haven’t already done so. The feature is tightly integrated with ATLAS Prime, so it cannot be bypassed. This means that you will need to fund your ATLAS Vault with ATLAS as well, as this will be used to pay the fees in the background. See the above chapter for instructions on how to set this up.
To enable the Hot Wallet, go to Settings, click Manage Section Settings, and enable the Use Hot Wallet toggle. You will see a red notice telling you that the Hot Wallet is still inactive because you have not set any Permissions. In order to remedy this, click the Advanced Hot Wallet Settings directly below the toggle.
In the Hot Wallet Advanced dialog, you can toggle all transaction types/categories for which you would like to use the Hot Wallet – or, in other words, which you would like to auto-sign.
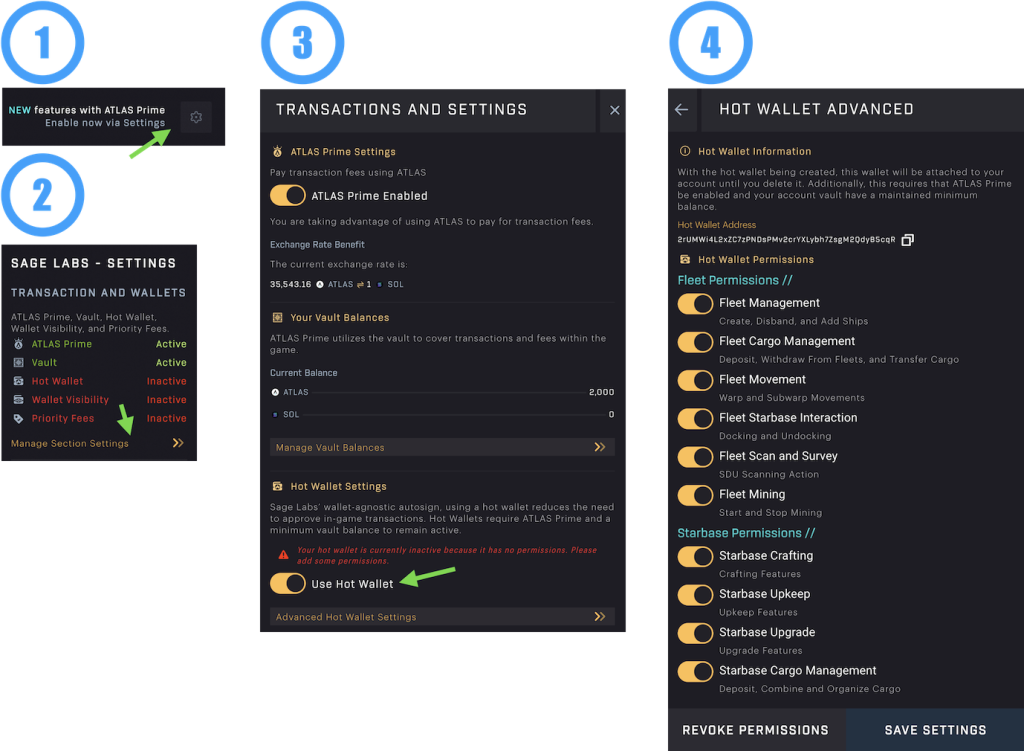
Starbased – Enabling the Hot Wallet
After you’ve done this, experience the game as it was meant to be!
In the future, the team will also add an option for you to use a hot wallet of your own creation in a similar setup. That route will likely not require you to use ATLAS Prime.
12. Frequently Asked Questions
Q: Can I mine in a star system if the Starbase is not maintained (upkeep supplies ran out)? A: Yes, you can. Mining is in no way influenced by the Upkeep of a Starbase.
Q: Where do I need to click to check up on the mining progress of my fleet? A: Counter-intuitively, you have to click the Stop Mining button (with the fleet selected) to pull up this data. You have to confirm this action there so you can safely click that button.
You’ve reached the end of this guide!
Go forth and have fun in SAGE Starbased!