Welcome to Part 1 of our SAGE Labs: Starbased Manual! In this first part, we go over everything you need to know to prepare you for the serious work that comes next. To be exact, in Part 1, you will learn more about the following topics:
- Starting (Setting up your account)
- New Browser (Profile)
- New Wallet (Account)
- ATLAS Prime
- Character Creation
- Welcome to SAGE Labs!
- The Dashboard (What are you looking at?)
- The Header
- The Map
- Sector Selection
- Sector Selection – Star System
- Overview & Show All Fleets
- Your First Steps (Depositing your ships & R4)
- Depositing Ships
- Importing Assets
- Fleets (Create your fleet)
- Shared Space
- Size Limitations
- Unlimited Fleets
- Creating New Fleets
- Preparing Your Fleet
- Loading up Food & Toolkits
- Disbanding a Fleet
- Undocking Your Fleet
- Tracking Undocked Fleets
- Movement (Start exploring)
- Subwarp
- Warp
- Exiting the Movement State
- Running out of Fuel
- Respawning
- Cargo (Stock up your fleet)
- Transferring Cargo to a Fleet
- Unloading Cargo from your Starbase
Note: There is also the optional Part 0 of this guide, which provides an introduction to the game and ecosystem. This is a great place to start if you are new to Star Atlas and/or Starbased.
Before We Start
Before we kick things off, some quick notes!
- Unresponsive — When something does not seem to work as intended, try refreshing the page. No, it’s not optimal, but it should at least allow you to keep going.
- 3D Graphics — If you came here after having seen some wonderful 3D graphics, then there is a good chance you are interested in the Unreal Engine 5 game the team is building. Or, perhaps you saw some shots from the next version of this browser game, SAGE Starbased, due in a few months.
- Faction Fleet — Ships that are part of Faction Fleet cannot be used in SAGE. If your ships are currently staked in the Faction Fleet (SCORE) initiative, then your first order of business is to get some (or all) out.
Note that you will need Toolkits available to be able to repair your ships to 100%. You can not get ships out of Faction Fleet if there are not enough Toolkits available to fully repair them! - Solana Wallet — We assume you have already installed a Solana Wallet, funded it with some SOL, and acquired one or more Star Atlas ships from the Galactic Marketplace. If you don’t yet have any of that, please read this guide by Phantom (on the wallets available).
- Solana Fees — We are not using ATLAS Prime (more on that below) in the manual so that we can print the fee costs in SOL. As the ATLAS-SOL price fluctuates, it is not a handy way to convey the costs of certain actions using this service.
Hardware Wallet
If you own a hardware wallet and are planning on spending a decent amount of money on Star Atlas ships and other assets, you will very likely want to play the game using that hardware wallet instead of using a hot wallet installed on your computer.
Signing for every transaction is a chore, but luckily, Starbased comes with an option to sign those for you, as long as you allow it to and are using ATLAS Prime. This is likely the way you’d want to play regardless of the sort of wallet you are using, but we want to mention it beforehand, as it may influence which wallet you want to use to play the game.
Note that changing your wallet later will result in you losing your progress. Or rather, it will not be possible to take your progress with you to another wallet. So, give this some thought before continuing.
Note that we’ll go deeper into ATLAS Prime and auto-signing in Part 3 of this manual.
Star Atlas Golden Era (SAGE)
1. Starting
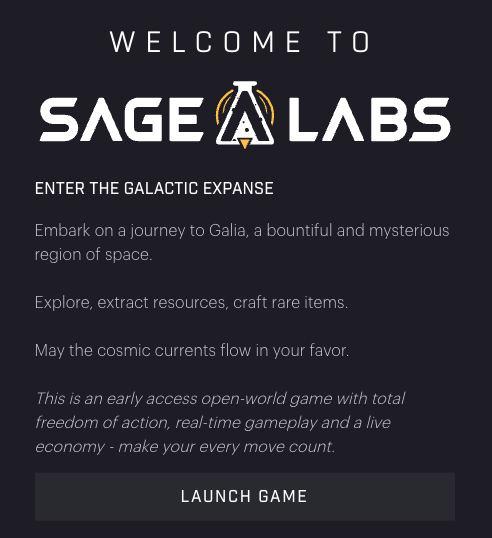
Welcome to Star Atlas Golden Era: Labs – Starbased, or just Starbased in short!
To get started, open a browser and head to https://based.staratlas.com. You should see something akin to the following image:
Starbased – The Welcome Screen
Click the Connect Wallet button and select the wallet that contains your Star Atlas ships.
New Browser (Profile)
If this is your first time using this browser, you will see the Welcome message pop up instead of the Wallet Chooser. Launching the game will trigger another popup with the Terms of Service and Privacy Policy. Hitting I Accept All will bring you to the Wallet chooser.
SAGE Labs – Welcome popup (before connecting)
New Wallet (Account)
If you are connecting an account (wallet) for the first time, you will run through an onboarding process. During this process, you will have to make certain choices, which you can read about below.
ATLAS Prime
If you have connected a new Solana account, then the first choice you’ll have to make is whether you want to use the ATLAS Fee Payer, better known by its official name, ATLAS Prime (AP). Enabling AP will ensure that transaction fees for gameplay actions will be paid in ATLAS instead of SOL. This means that you do not have to worry about the amount of SOL in your wallet; the only thing that matters is that you have enough ATLAS*.
* This is not entirely true, as we’ll see in Part 3, where we go deeper into ATLAS Prime.
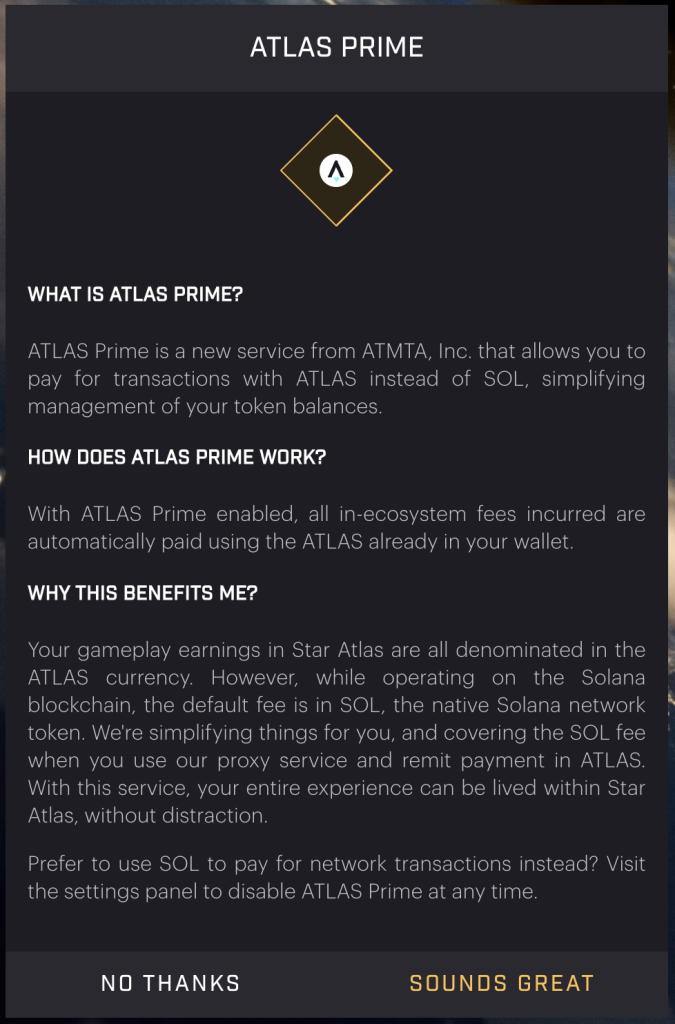
SAGE Labs ATLAS Prime
Clearly, this is beneficial to new people coming into the ecosystem, as this means you need only one token to play the game. Of course, SOL is still required outside of Starbased, but one step at a time!
First off, whatever you choose here, you can always change your choice later, mid-game. Therefore, just go with what is easiest for you right now. If you are unsure, then you may want to consider this:
If you are OK with paying a very small ATLAS fee to have the game auto-sign your transaction (recommended!) and you already have ATLAS in your wallet, then go ahead and toggle on ATLAS Prime by clicking Sounds Great.
On the other hand, if you own enough SOL and are fine with paying fees using that token, for starters, click No Thanks. Using SOL is the cheapest way to play the game, but you will not be able to use auto-signing for your transactions.
You can read more about ATLAS Prime in Part 3 of this guide!
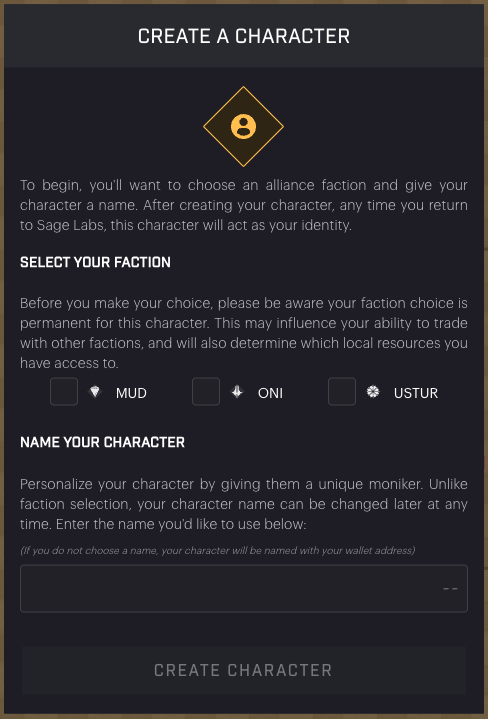
Starbased – Character Creation
Character Creation
Your next order of business is to create a new character for your account. The game needs two pieces of input from you: the Faction you want to be a part of and the Username you want to use.
Note that creating your profile will cost you 0.0153333 SOL in fees to store everything on the Solana chain. The vast majority of that is locked into accounts that you, in theory, could get back if you are ok with deleting your whole account. The team does not provide a way to do this. Most other game-related (so-called) rental fees are shorter-lived and will be automatically reclaimed at appropriate points throughout gameplay. If this fails (which sometimes happens), the game will –at some point– ask you to reclaim outstanding, obsolete rental accounts.
1) Faction Selection
We have a pretty old guide to help you choose your faction, which is still surprisingly accurate. That said, if you see the term SCREAM, replace that with Starbased in your head.
One thing the guide alludes to is that it may be more profitable to join the least active Faction (accumulating the lowest amount of LP/day on average). This is certainly the case in the short term, but it may matter less in the long term, as the balance is likely to keep shifting.
Note that it’s important to take your Faction Selection seriously, as you will not be able to change this afterward. If you do want to play under another Faction banner, then you will have to create a new account, thereby losing the progress you had accumulated on your current account.
In other words, this faction choice is permanent and will forever mark the Solana account (wallet) you are using as a member of that Faction.
2) Username
You can choose any name you like; it does not have to be unique. What’s more, you will be able to change it whenever you feel like it.
Hit Create Character at the bottom to get going!
Nothing Happened?
Warning! If, after character creation, you return to the same screen you saw before, with the top right corner still asking you to Connect your wallet, feel free to hit that button. If, after selecting your wallet, you are asked to create an account, again, don’t! Instead, refresh the browser, wait a little (a minute tops), and try again. At some point, you should no longer be asked to create a new character, though you could see a popup appear asking you to select an account:
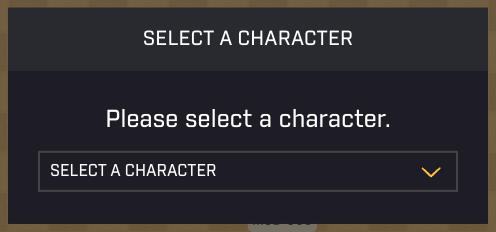
If this ever pops up after connecting your wallet, select your character to log in to the game.
If you follow the steps described above, there will only be one account in that dropdown. Simply select it to progress to the next step. If this still does not update the interface, you may have stumbled upon a more serious error, and it may be best to give it some time and try again later. Make sure to give your browser window a hard refresh before trying again (Shift + F5 on Windows, Shift + Command + R on Mac).
Welcome to SAGE Labs – Starbased!
With your character created, you are ready to go! The Galia Expanse lies at your feet!
Quite literally, as it turns out. You should be seeing something very much like the image below. Note that this account chose Ustur, so the map shows Ustur territory (Ustur’s domain in in the top right of the galaxy map. That map is also called… the Star Atlas!).
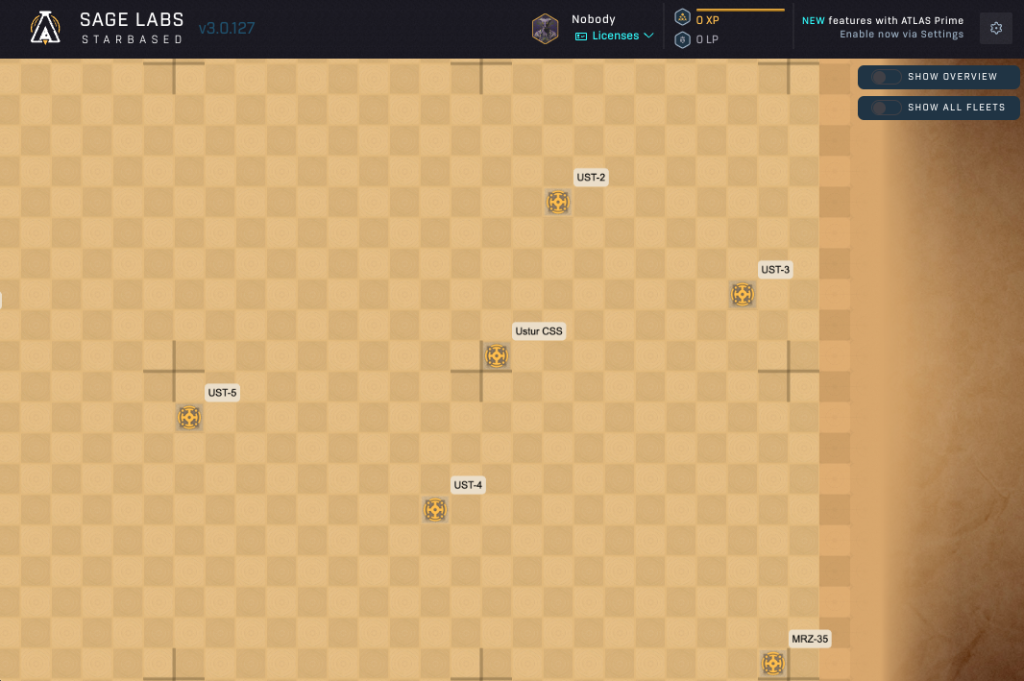
Starbased – Welcome to the Galia Expanse
A few quick remarks:
- First off, the galaxy is not displayed on a black/dark space background like you are probably used to for games like these. Star Atlas has chosen a different aesthetic that feels more like an old map (a… Star Atlas).
- You can move around the map by clicking and dragging
- You can zoom in/out with your scroll wheel or by swiping up/down on a touchpad
Let’s go over the User Interface first!
2. The Interface
Let’s first take a closer look at the user interface you are presented with!

Starbased – Header
The Header
At the top of the screen is a header that will stay there throughout the game. It has the following elements:
- Logo and name
- Your name and Licenses – You can click the Licenses to see the amount of XP you gathered on each of the four currently operational: Pilot, Data Running, Mining, and Crafting.
- Your current Experience Points (XP) and Loyalty Points (LP) – We’ll go deeper into XP, LP, and Licenses in Part 3.
- A text hint suggesting to check out some new great features built around ATLAS Prime.
- A Settings button – The cogwheel opens up a wide assortment of options, which we’ll discuss in Part 3.
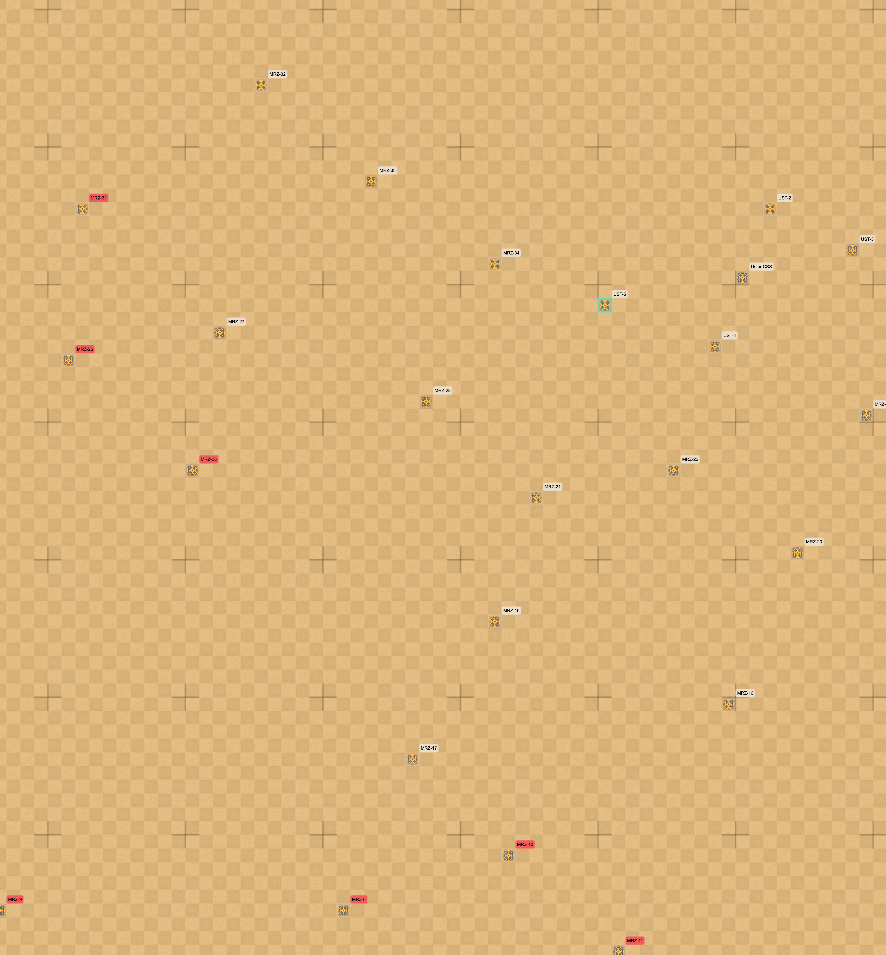
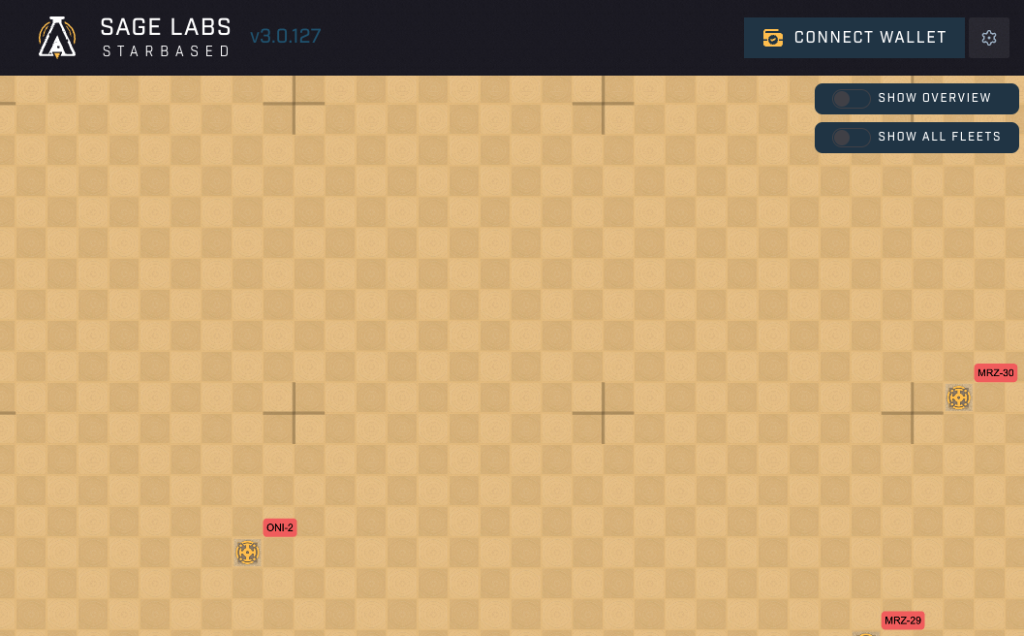
Starbased – The Map (or part thereof)
The Map
The most eye-catching part is easily the big map of the Galia Expanse, which occupies most of your screen’s real estate. A major deviation from SAGE Labs V1 is that this map is interactive and the primary way to navigate between Starbases and to give commands to your fleets.
The map contains 101 x 101 sectors depicting the entirety of the known Galia Expanse. Every two neighboring sectors have been assigned a different background color, giving the map a big checkerboard vibe. Big plus-like symbols help break the map down, visually creating 10 x 10 sector groups.
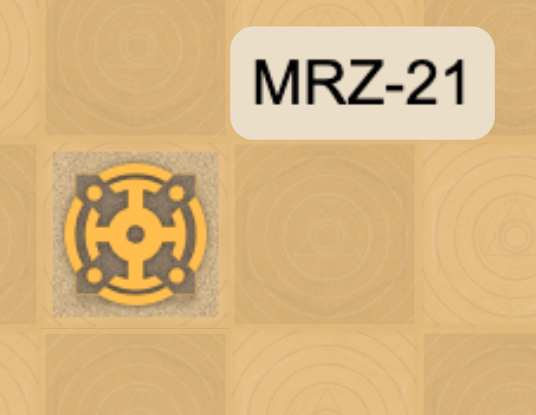
Starbased – This icon depicts that this sector is home to a Star System. The label in the upper right corner lists the sector’s code/designation.
The Galia Expanse and this map contain 51 sectors that are home to a Star System, with each Star System home to a Faction Starbase and an Asteroid Belt for mining.
Control of these 51 star systems (through their Starbase) has been equally split between the three major (playable) factions, with each faction controlling exactly 17 star systems (51 / 3 = 17). Each such group of 17 systems can be subdivided further into 5 Safe Zone and 12 Medium Risk Zone systems. Although the difference between these zones plays no role at this point in time, it influences the naming of the various systems.
The Star Systems that lie in each faction’s Safe Zone are prefixed with “UST”, “ONI”, or “MUD”, dependent on the faction that controls them. The systems that are part of the Medium Risk Zone are all prefixed with “MRZ” instead.
Three systems stand out, and these are the “Ustur CSS”, “MUD CSS”, and “ONI CSS” systems (note the lack of a number suffix). These mark the systems that harbor the Central Space Station (CSS) of each respective faction, which is where your adventure will begin. Take note of the location of your faction’s CSS and the systems around it.
Two toggles are hovering over the top right side of the map, but we’ll get to those later. Let’s first talk about the sidebar appearing to the left once you click on a sector on the map.
Sector Selection
You can select any Star system you want to zoom in on by simply clicking on the square on the map. If you select a sector that is not home to a Star System, you will see the following (left image):
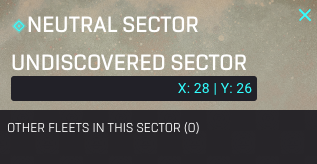

Starbased – Selecting a sector without a Star System
It will always say Neutral Sector at the top and Undiscovered right below it (for now). It will also show the coordinates of that sector. The 101 x 101 map has a coordinate system where the middle sector is 0, 0, meaning both the X-axis and Y-axis run from -50 to +50.
Below that header is a small text that tells you if there are other fleets in this sector. This information is near useless at this point, but will play a significant role in the future, when combat arrives to the game.
For now, if you wish and there are fleets present, you can click the +-symbol to view the fleets present (see the right picture above). This shows the name of the fleet and a summary of the ships that make it up. If you want –and again, this will be more useful in the future with combat present– you can click on the fleet to get even more information:
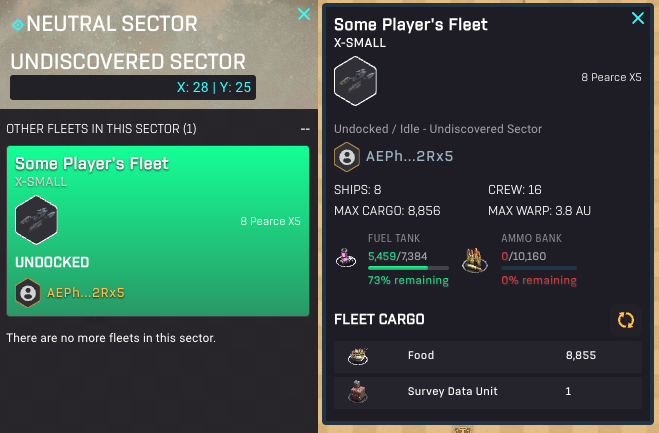
Starbased – Other Fleet Details
Now you can see more details on the fleet’s composition, the state of its Fuel and Ammo, and what cargo it is currently carrying. As the fleet may be mining [Note: only possible in star systems] or scanning, there is a small refresh button next to the cargo section so you can check if its cargo has changed over time.
Sector Selection – Star System
If you select a sector that is home to a star system, things change drastically:
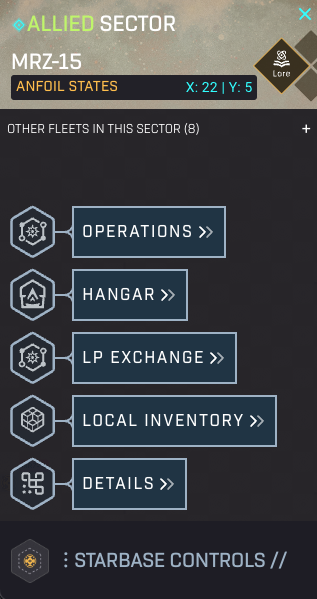
Starbased – Selecting a sector with a Star System [Note CSS systems come with one more option)
Now, the top will say Allied or Hostile Sector, depending on whether your faction or another faction is in control of that star system. On the map, the white labels signal your faction controls the system, whereas the red labels signal they are owned by one of the two other factions.
Instead of “Undiscovered”, you now see the code/designation of the sector followed by the name of the Star System that resides within. In the case of the example shown above, the sector is called MRZ-15, whereas the star system’s name is the Anfoil States.
There is a small Lore button in the header for all sectors containing a Star System. It’s well worth clicking it and reading through the lore. Though it may matter little now, at some point, lore will spill over into the game (especially the UE5 Flagship game) and impact your actions.
Below the header, a menu with several options has popped up, dubbed the Starbase Controls. You can open/close this menu by clicking the Starbase Controls toggle at the bottom. You may have noticed this toggle being present on sectors without a star system as well, but clicking it would not summon a menu there.
You’ll play a large portion of the game through the Starbase Controls, and as such, we’ll go over these in much greater detail in the remainder of this manual (all parts) as we discuss various operations in this manual.
One item we won’t bring up, however, is the Details option at the bottom. It provides mostly technical information about the sector and starbase that are irrelevant to anyone except developers & support. A notable exception is the top of the Details dialog, which shows the minable resources present in the Asteroid Belt that every star system is home to. It also shows the hardness and richness of these resources, which are relevant when we discuss mining (in Part 2 of this manual).
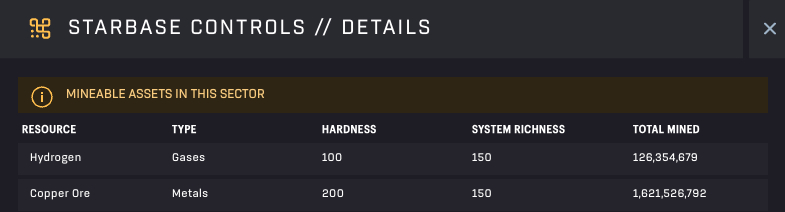
Starbase Controls – Details
Overview & Show All Fleets
Finally, let’s go over the two toggles in the top right of the screen.
Show All Fleets
The bottom one, Show All Fleets, will do exactly that. It will populate the map with discs and arrows of various sizes and colors. Each of these represents a fleet. If the fleet is moving, it is represented by an arrow. If it is not, then it is shown as a disc.
Just because a fleet is a disc does not mean it is idle. It could be scanning or mining (if it is in a Star system).
The size of a fleet’s representing, be it a disc or arrow, represents the size of the biggest ship in that fleet. The bigger the representation, the more formidable the biggest ship. Color fulfills a similar function with each color representing a different size class.
Note: Your own fleets will always be visible on the map in exactly the same manner!
Show Overview
Show Overview fulfills a completely different use case. We’ll revisit this in later parts, but in short, it shows an overview of crafting projects (active and completed) in the Crafting Processes-tab and an overview of idle, undocked ships in the Sector Survey-tab. This last tab is really meant to make Scanning more easily accessible when you want to do so with multiple fleets. We’ll dive deeper into this in the Scanning section in Part 2.
3. Your First Steps
Before you can create your legacy in the Galia Expanse, you first need to get your assets into the game!
If you have no ships available, it’s time to visit the marketplace. For the purpose of this manual, however, we assume that you already own some ships. It’s also important to bring some Fuel, as your ships need this to move around and perform useful activities in space.
Whenever you bring assets (such as ships & resources) into the game –or when you want to take them out– these will always move through your Faction’s Central Space Station. Therefore, the only way to perform such actions is through the Starbase Controls of your Faction’s Central Space Station.
On the map, navigate to the sector marked with your Faction’s name followed by CSS (e.g., Ustur CSS, ONI CSS, MUD CSS), and select it.
You will see Starbase Controls pop up as usual. However, because this is the Central Space Station, one additional option, named Port of Entry, is slotted into the second position from the top, below Operations.
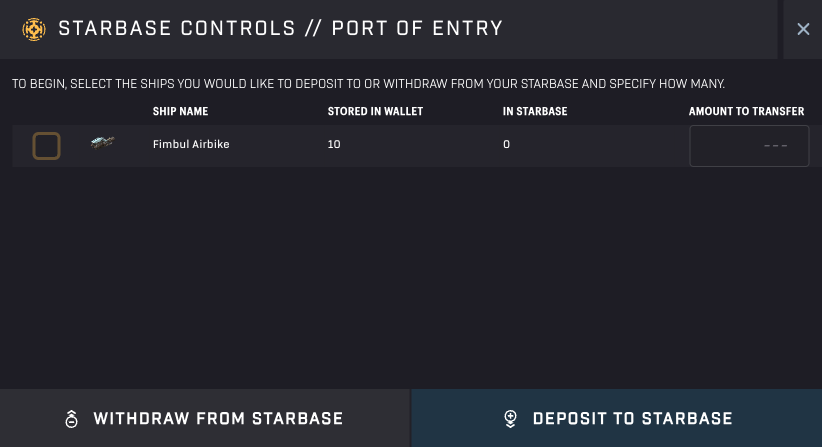
Starbased – Deposit or Withdraw Ships to/from the game
Depositing Ships
Clicking Port of Entry in the CSS’s Starbase Controls will show the above dialog.
Here, you see an overview of all ship models that are present in your wallet and (later on) at this particular Starbase. For each ship model you want to move into the game, simply click the checkbox that is in front of it. If you have multiple ships of this model, you can change the number on the right-hand side. Note that you can forgo clicking the checkbox and directly input the numbers you want into the input box(es) as well.
Tip: Click directly on the number of ships beneath “Stored in Wallet” to automatically fill in that number in the input box!
Once you are happy with your selection, click the Deposit to Starbase button at the bottom-right and sign the transaction.
Fees
Note that each ship type you import will come with a one-time 0.00203928 SOL fee to create the required accounts (storage) on-chain. Ship-deposit actions will cost you an additional 0.00033408 SOL fee per ship-type/model, every time you do so.
Withdrawing Your Ships
Now that we are here, the same dialogue can also be used to withdraw your ships to your wallet. Simply select any of the ships present in the Starbase, alter the number to your liking, and press the “Withdraw from Starbase”-button instead.
Note that you can only withdraw ships that are docked to your Central Space Station (the Starbase in this system).
Importing Assets
Click the Local Inventory button in the Starbase Controls next to open up a different dialog. Non-ship items, such as resources, are managed through this dialog instead.
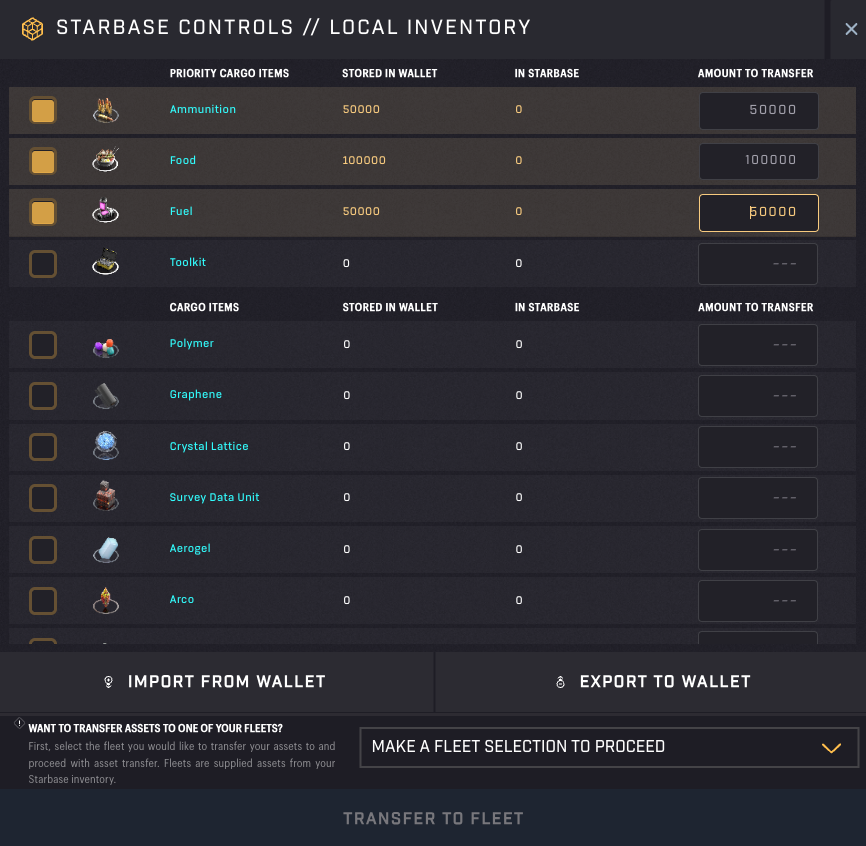
Starbased – Local Inventory
You can move resources between your wallet and the CSS (game) in a similar fashion as you previously moved your ships. Simply click the resources you want to move and/or enter the amount in the inputs on the right-hand side. Then click the “Import from Wallet”-button and sign the transaction that pops up.
Depending on what you want to do in Labs, you will need different resources. We’ll dive deeper into this in Part 2, but here is a short overview:
- Movement: Fuel
- Scanning: Food (for non-Data Runner ships)
- Mining: Ammo (for non-Miner ships), Food & Fuel (in order to visit the asteroid)
- Crafting: – (though Food could speed things up)
- Upgrading: – (though Toolkits may be needed)
Note that there is another section at the bottom of the dialog that allows you to transfer assets to the cargo of one of your fleets. We’ll get into this in the Cargo chapter!
Fees
Similar to depositing ships, the first time you deposit a new resource type, you will pay a one-time 0.00203928 SOL fee. Fortunately, afterward, depositing itself costs hardly anything, coming in at 0.0000066 SOL per resource deposit action taken.
Exporting Assets
Similar to ships before, you can also export resources and non-ship assets from the game (back) into your wallet. Select the assets you want to move to your wallet and click Export to Wallet.
4. Fleets
In SAGE, you are not operating individual ships; instead, you are operating different fleets, each composed of one or several ships. Activities taking place outside of the CSS, such as Mining, Scanning, and Transportation, will require a fleet. If you successfully imported your ships in the previous chapter, you should now be able to create one.
Shared Space
Ships inside of a fleet share everything they need to function, be it Fuel or Ammo. As such, when preparing for your voyage and thinking about the amount of Fuel or Ammo you need, you can add up the maximum capacity each ship comes with for storing such items, and you only need to take into account these sums.
The same goes for the total available Cargo space (sum up the Cargo Hold capacity). The amount of resources you can mine depends only on the total cargo space the individual ships in your fleet offer.
Size Limitations
You can not just add an infinite amount of ships to a single fleet. Every ship has been assigned a point value based on its size class. Smaller ships represent a small amount of points, while bigger ships have bigger point values associated with them. All fleets are capped at 145 capacity points, meaning you can not form fleets that exceed that point value.
Below is an overview of the various ship size classes and the points a ship from that size will represent within a fleet:
| Size Class # | Size Class Name | Points |
|---|---|---|
| 1 | XX-Small | 1 |
| 2 | X-Small | 4 |
| 3 | Small | 9 |
| 4 | Medium | 16 |
| 5 | Large | 25 |
| 6 | Capital | 36 |
| 7 | Commander | 49 |
| 8 | — | 64 |
| 9 | Titan | 81 |
Ship Class Fleet Points
Note that Hangar Bay components, which are present on some of the bigger ships, do not provide any bonuses here.
Unlimited Fleets
Though the size of a single fleet can not exceed 145 points, you can create an unlimited number of fleets in Starbased. Note, however, that though Starbased allows you to use all of your ships, in a future iteration of SAGE, you will have to first earn that privilege by leveling up your Council Rank (more on that in Part 3)!
Creating New Fleets
If you followed the previous chapters in this manual, you likely have the sector that contains your Faction’s CSS still selected. If not, then select it now. You can only create fleets at Starbases where you have ships, and at this point, that means your CSS. In the future, once you have ships at other Starbases, you can use the same flow to create fleets there
In the Starbase Controls, click on Hangar to show the following dialog:
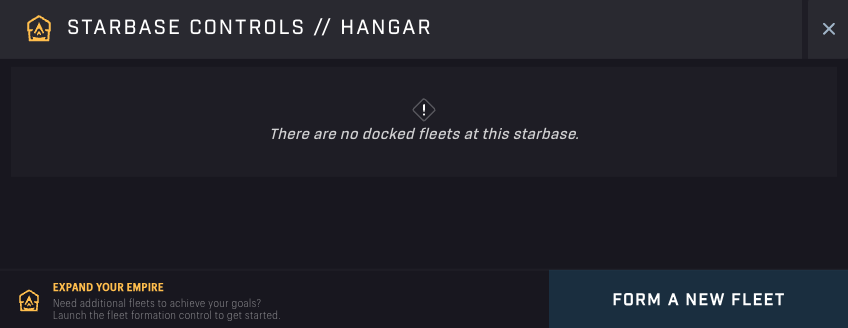
Starbased – An empty Hangar
This is where all fleets currently docked to the Starbase will be displayed. Obviously, at this point, you have none. Let’s change that! Clicking Form a New Fleet will present you with the following:
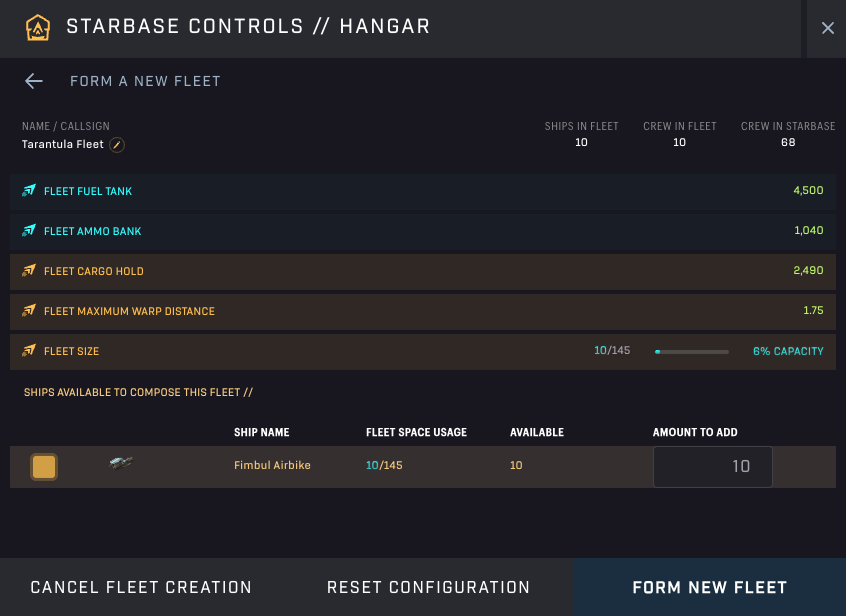
Starbased – Fleet Composer
This view may look daunting, but most elements here are just to give information about the fleet you will be creating. These numbers may help you make strategic decisions about the fleet’s composition.
At the top left (below the header and back button), you see an auto-generated name/callsign for your future fleet. If you click it, you can change it to a name of your choosing.
In the bottom half, you see an overview of all the ships that are present at this Starbase that are not currently part of a fleet. Here, you are able to select the model and amount of ships you want to include.
As you input ships and change their amount, notice how the numbers in the top half change. These show valuable metrics of your future fleet. Besides seeing the combined size of the ships’ dedicated Fuel and Ammo storage, you’re also provided with the fleet’s total Cargo space, as well as maximum warp distance (more on that in the Movement chapter below).
One of the most interesting metrics here is the Fleet Size. This will show the total capacity of the ships you selected. See the Size Limitations section above for more information.
Once you are done selecting the ships you want to include in your new fleet, click the Form New Fleet button at the bottom right. You can, at any point, click the Reset Configuration button to start over from scratch.
Congratulations, you’ve successfully created your first fleet!
You will be sent back to the top view of the Hangar dialog, where your new fleet will appear (you may have to wait a short moment)!
Starbased – Hangar – Docked Fleets
Fees
Creating a new fleet will cost you 0.01132804 SOL per fleet. These fees are Solana costs that will be used to create the various accounts required to manage your fleet on-chain.
It’s good to know, however, that you will get 0.0056 SOL back when you disband the fleet again later.
Preparing Your Fleet
Before you can use a fleet, you need to make sure it is sufficiently fueled and undocked from the Starbase.
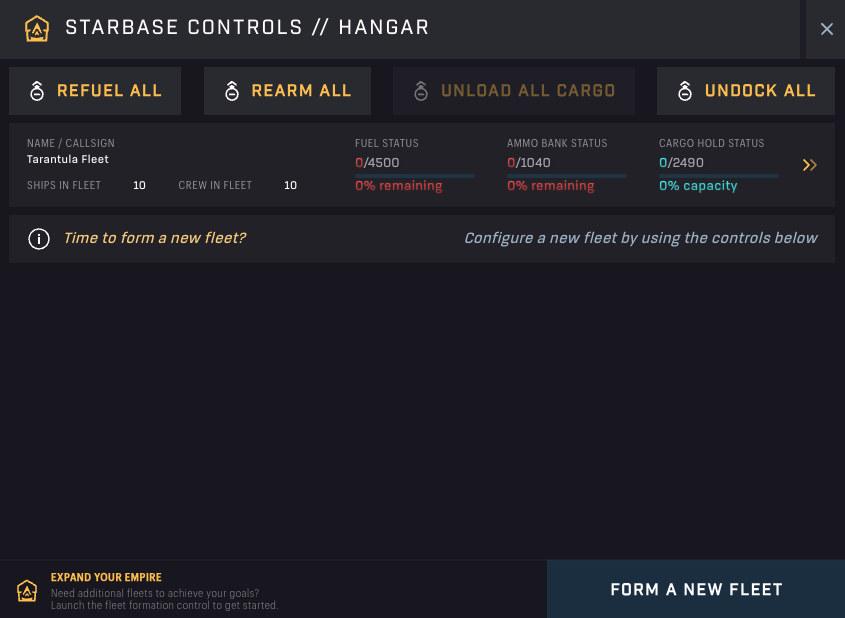
Ordinarily, you would select the sector of the Starbase that contains your fleet. Click the Hanger button in its Starbase Controls to get an overview of your fleets that are docked to that system. But if you follow along with the introduction, then this screen is already in front of you.
In this Hangar view, you can execute some actions for all docked fleets in one go. You will likely use the four buttons at the top often, even if you have but one fleet present. It saves a trip into the fleet’s details to micro-manage it. However, sometimes you need to do things that you can not do from her, so–for now–let’s select the fleet in this view to go a level deeper and bring up the Fleet’s details:
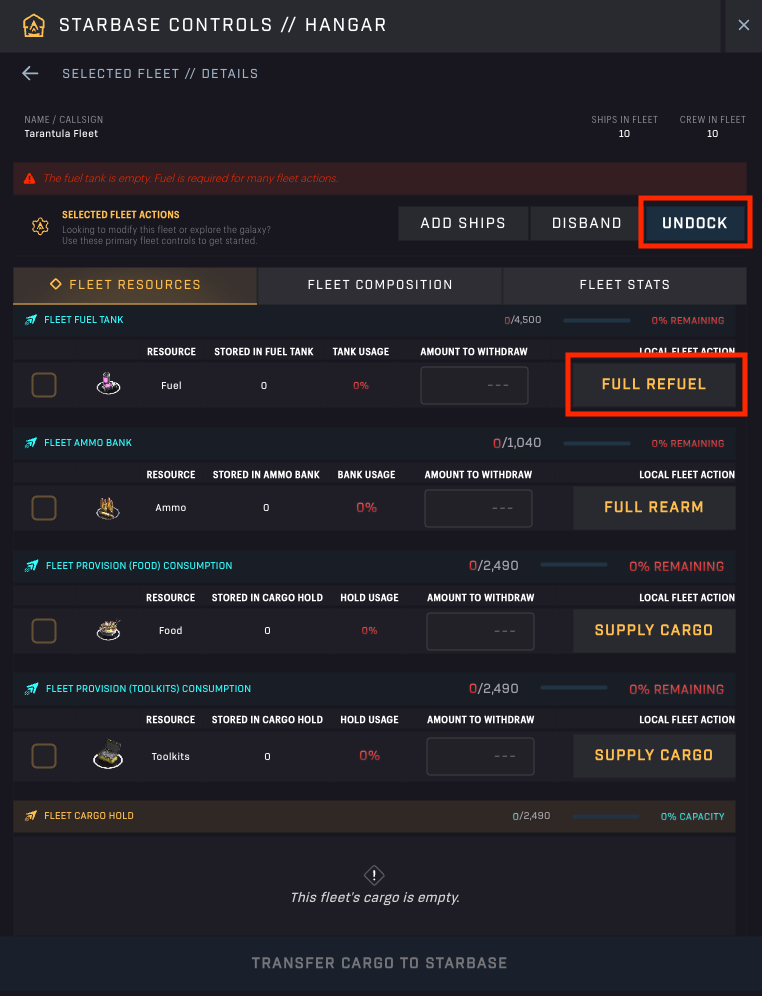
Starbased – Hangar – Undock & Refuel (red accents by us)
This dialog presents a lot of options! Let’s focus first on what is needed to ensure a fleet can move. For this, both the Full Refuel and Undock options are relevant. If you have deposited enough Fuel into the Starbase, you will be able to refuel your fleet using the Full Refuel button. It does exactly what you expect: it fills up the fuel tanks of all ships in your fleet to the max, or the extent of fuel available at the Starbase (put there previously by you).
After you approve the transaction, the Tank Usage will increase to 100%, meaning your fleet is ready to go!
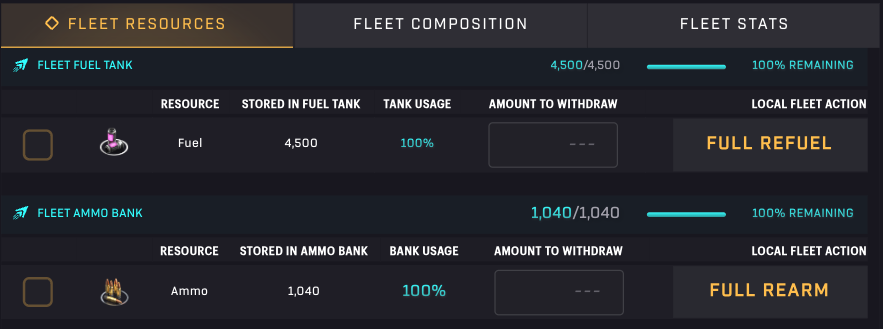
Starbased – A fully fueled and armed fleet!
Before sending away your fleet, you need to have a clear plan of what you want to do with it after you’re done moving it to its destination. Certain actions, depending on the ships that make up your fleet, require you to load up on additional items, such as Ammo, Food, and/or Toolkits.
Like Fuel Tanks, ships come with Ammo Banks built into them. As such, you can move ammo straight into those banks using the Full Rearm button. On the other hand, Food and Toolkits need to be added to the Cargo space.
Note that the input boxes are used to withdraw Fuel, Ammo, Food, and Toolkits from your fleet. By adding a number and hitting the Transfer Cargo to Starbase button at the bottom of the dialog, you will lower the amount available in your fleet.
Loading up Food & Toolkits
You could hop over to the Local Inventory dialog to stock up on Food and Toolkits, but to make your life easier, the team added shortcuts to add Food and Toolkits straight to your cargo holds from here. Note that the remaining space shown is the same for both options, as this depicts the total amount of cargo space you have available in the fleet.
When you hit the Full Refuel or Full Rearm button, you will get to sign a transaction right away. However, when you hit the Supply Cargo button next to Food and Toolkits, the game needs to know how much of the respective resource you want to transfer. That is why another dialog will pop up, asking you to input the number you want transferred.
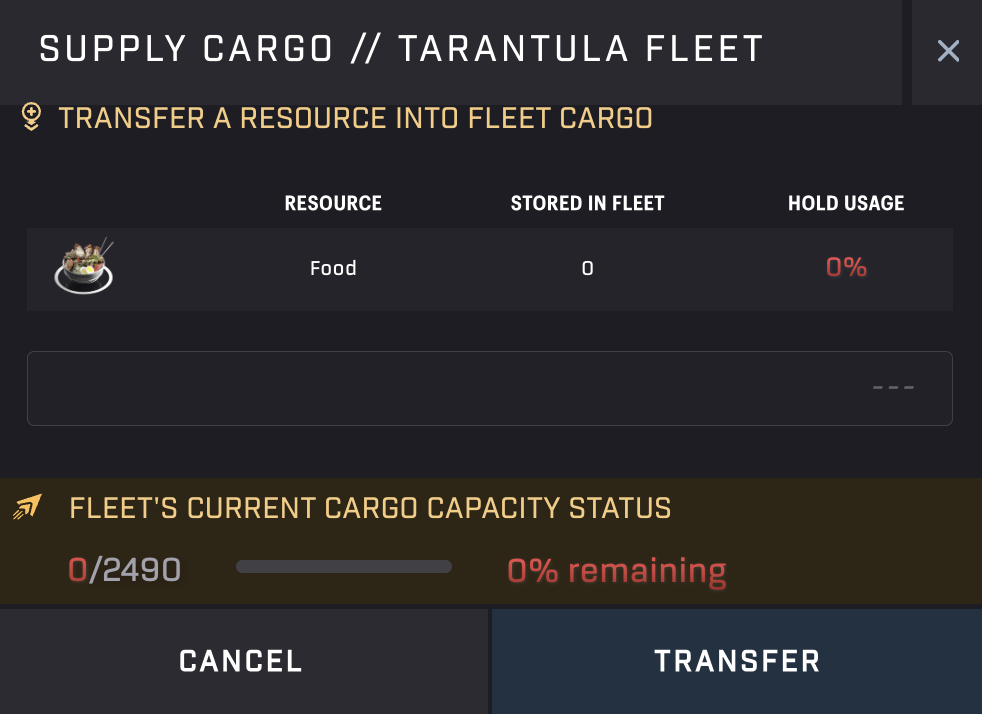
Starbased – Supplying Food/Toolkits through the Hangar
Unlike the Local Inventory, this small dialog does not show you the amount of Food/Toolkits you actually have available at the Starbase. It only shows the remaining available cargo space as the upper limit.
What is relevant to load up on depends entirely on what you want to do, after you’re done moving. Do you want to Scan for Survey Data Units (SDUs)? Do you want to Mine an asteroid? Or do you want to transport goods to another Starbase?
Let’s briefly explore these options (explored in more detail in Part 2 & Part 3):
- Mining — Mining without non-miner ships requires you to bring Ammo (depleted over time while mining)
- Scanning — Scanning with non-Data Runner ships requires you to bring along Food (a little is consumed per Scan)
- Transport — Whatever needs transportation
- Crafting — You may want to bring Food to pay Upkeep to increase crafting speed at the Starbase, on top of potential materials to use for crafting
- Upgrading — Toolkits are required to keep aStarbase’s Upgrade process going. If not enough has been supplied, you may need to bring your own. You likely also want to bring whatever resources you want to contribute to the upgrade process.
Before you undock your fleet, let’s quickly review the two other buttons at the top of the Fleet Details view: Add Ships and Disband. The first is rather straightforward; it allows you to add ships present at the Starbase. Let’s go a little deeper into the Disband option.
Disbanding a Fleet
Disbanding a fleet is an action you want to take when:
- You want to withdraw the ships back to your wallet (only possible at the CSS)
- You want to use the crew available on those ships to craft (more on that in Part 2)
When you disband a fleet, all cargo, field, and ammo will automatically be added to your inventory at that Starbase. In other words, nothing is lost. You will also see your Solana rent deposits returned that you spent when creating the fleet (see above).
Undocking Your Fleet
Once you have fully prepared your fleet, you will need to undock it from the Starbase before you can send it anywhere. Click the Undock button at the top right and approve the transaction. If successful (give it a little time), you will be automatically brought back to the Hangar dialog, which now shows no more fleets!
This is as expected because the Hangar only shows docked fleets, and you just undocked your fleet from the Starbase. The fleet is now sharing the same sector as the CSS (or Starbase that you created the fleet), so you can easily find it back by clicking on the sector that contains your CSS.
You should observe that the sidebar to the left has been updated to show your fleet at the top:
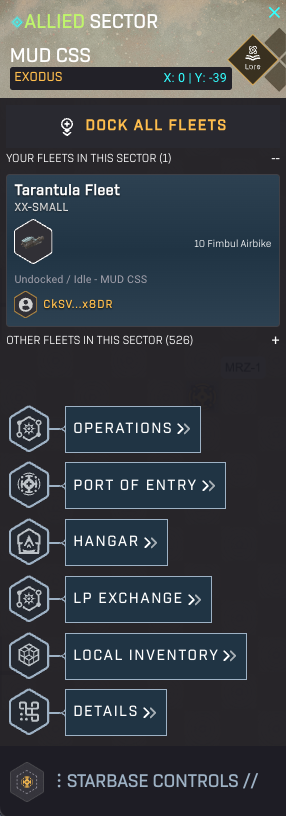
Starbased – Your fleet is now in the same sector as the CSS
Before we continue, let’s first see an alternative way to find your undocked fleets.
Tracking Undocked Fleets
You may notice that the buttons that hover over the top right corner of the map have gotten company. Whenever you have any undocked fleet on the map, the square button with a fleet icon will show up.
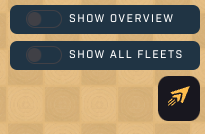
Starbased – A new button appears when you have undocked fleets
Clicking this button will replace it with a small popup that shows you all of your fleets and what they are doing. To their right is a (double arrow) button that will select the sector the respective fleet is presently located in.

Starbased – Quick menu to track your fleets
Managing Undocked Fleets
When you have the sector with the fleet selected, click the fleet to open both a dialog with fleet details (same as when you select a non-owned fleet on the map) and a control pane on top of the lower left bottom of the map:

Starbased – Fleet Controls
The number of controls (buttons) will differ depending on where the fleet resides on the map, but it should look like the above image when the fleet is in a sector with a Star system (and hence a Starbase). Going from left to right, the following buttons are visible here:
- Dock — Docks the fleet with the Starbase present in the sector. This will return the fleet to the control of the Starbase and make it available in the Hangar again.
Only available when in a sector with a (non-hostile) Starbase. - Warp — Move the fleet using the Warp (see the Movement Modes section below)
- Subwarp — Move the fleet using Subwarp (see the Movement Modes section below)
- Mine — Mine the Asteroid Belt present in this Star System.
_Only available when in a sector with a Star System/Asteroid Bel_t
Requires Ammo if there are non-miner ships present in the fleet. - Scan — Start a sector scan.
Requires Food if there are non-scanning ships present in the fleet - Self-destruct — Pay 150 ATLAS to destroy the fleet and return the ships to the CSS. All cargo and supplies will be lost. This is only meant to be used if the fleet becomes stranded due to running out of fuel.
Use Dock when you arrive at a Starbase after having moved there to dock to that sector’s Starbase. If you have not moved at all but have been mining or scanning this very sector, you would likely use this afterward as well to be able to unload the resources you gathered.
In the next chapter, we’ll discuss Warp, Subwarp, and Self-destruct. Part 2 provides more information on Mining and Scanning.
5. Movement
You have a fleet, and now it needs to go and make you money (or other on-chain assets)!
There are two modes of travel in SAGE Labs: Warp and Subwarp. Both will get you where you want to go, but these options function radically differently as they each come with different pros and cons. In short, Warp is quicker, but it also comes with increased Fuel costs.
Subwarp
Subwarping moves the fleet to the destination you select, one sector at a time. Every sector you move through will cost you some Fuel. You will be able to select any sector on the map and get a Fuel and Time projection. Make sure to bring enough Fuel for the return trip as well!
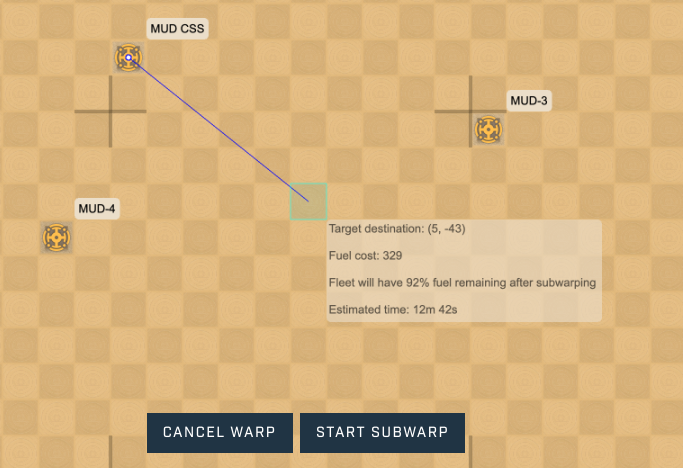
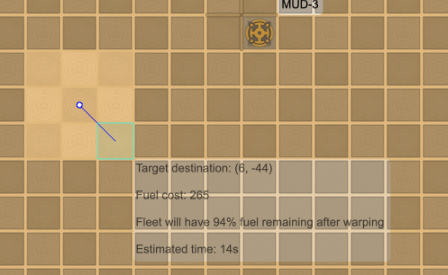
Starbased – Initiating Subwarp
Click the Subwarp button and select a sector on the map. You will see a blue line appear that visualizes the flight path. At the end of it, you will see a popup showing the coordinates of the target location, the fuel it will cost you to get there, the amount of fuel remaining after the movement is completed, and the time it will cost to get there.
Click the Start Subwarp button and sign the transaction to confirm the flight plan. After you have done so, you will see the fleet details in the upper right corner update. It now shows the destination coordinates and the remaining time, in addition to a Stop Subwarp button.
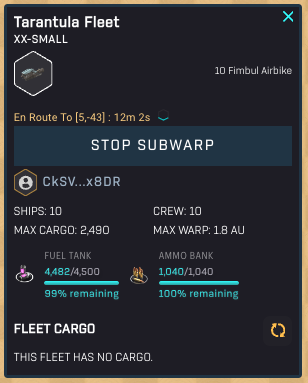
Starbased – A fleet in transit
The Stop Subwarp button will trigger a transaction through which you can force the fleet to end its movement. Note that this is meant to be an emergency measure; you should always strive to subwarp your fleet to its intended destination. Using this button to stop subwarping will cost you the amount of fuel required to move one sector. The fleet will abort its movement and remain in whatever sector it found itself in at that time.
If you click the fleet button in the top right corner, you will also see the fleet has been assigned a movement status.

Starbased – Undocked Fleet Overview
If you check the map, you will see a triangle representing your fleet moving along the planned trajectory:
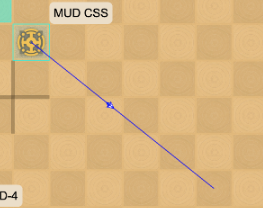
Starbased – A fleet in motion
This is another visual indicator of the progress the fleet has made and where it is located right now.
Note: You may notice the fleet disappearing from the left sidebar at some point. This does not mean the fleet has arrived; instead, it simply means it has left the sector where it started its journey.
Subwarp Speed
The speed at which your fleet subwarps will be equal to the subwarp speed of the slowest ship in your fleet. This may be important to take into account during the creation of your fleet.
This handy spreadsheet provides an overview of all ship stats, including the subwarp speed for every ship.
Warp
The alternative to subwarp is Warp. It is much faster than subwarp but also more costly. Furthermore, the distance you can warp is not limited just by the fuel you have. Each ship has a maximum warp distance, which means that you may have to warp multiple times to reach your destination.
Starbased – Initiating Warp
Initiating a Warp is much like Subwarping, except that the interface will block sectors you can not reach due to your fleet’s warp distance limitation. Click the Warp button and select a sector that is within the maximum warp distance. You will see the blue line and the popup with details like before. Note that the Fuel cost per sector has gone up while the estimated time has gone down.
Cooldown
Though warp is very fast, it comes with a cooldown. After every warp, your fleet will have to wait a bit before it can perform its next warp. Your cooldown will start immediately after the fleet has arrived.
Warp Speed
Contrary to subwarp, the warp speed of your fleet is equal to the warp speed of the fastest ship in your fleet. The idea here is that this ship creates a bubble that encapsulates the other ships in its vicinity.
In a similar vein, the maximum warp distance of the fleet is equal to the maximum maximum warp distance of any ship in the fleet.
You can use this handy spreadsheet for an overview of all ship stats, including the warp speed for every ship that exists.
Running out of Fuel
If you run out of fuel, you better be in a Star system already. If you are, dock your fleet right away and:
- Transfer Fuel you stored at the Starbase to your Fuel Tank
- Transfer excess Fuel from your cargo to your Fuel Tank (via the Starbase’s storage)
- Get another fleet to transport Fuel to the Starbase so you can transfer that to your fleet.
Respawning
If you run completely out of fuel in the middle of nowhere, you have no other option but to respawn your fleet, losing all items in your cargo hold. These items will not spawn on the position you occupied on the map, but will be burned instead.
To respawn, you will need to self-destruct. You can do so by selecting the fleet (first select the sector it is in) and clicking the Self-destruct button at the far right of the Fleet’s controls.
Respawning a fleet is a very costly affair! No matter the type or size of your fleet, you will have to pay a flat 150 ATLAS fee. In the future, this fee will likely be dynamic and based on the actual fleet’s composition to account for increased towing costs in such cases. But for now, every fleet is charged the same flat fee. Any fees paid this way will be sent to the Star Atlas DAO’s treasury.
Respawning will always return all ships in the fleet to your faction’s CSS.
6. Cargo
Almost everything you do in SAGE Labs requires you to move assets around in the Galia Expanse. To that end, let’s look at how you can transfer assets between your fleet’s cargo holds and a Starbase.
Transferring Cargo to a Fleet
You can only move cargo in and out of a fleet when it is docked to a Starbase. Open the Starbase Controls for the relevant Starbase and click the Local Inventory button.
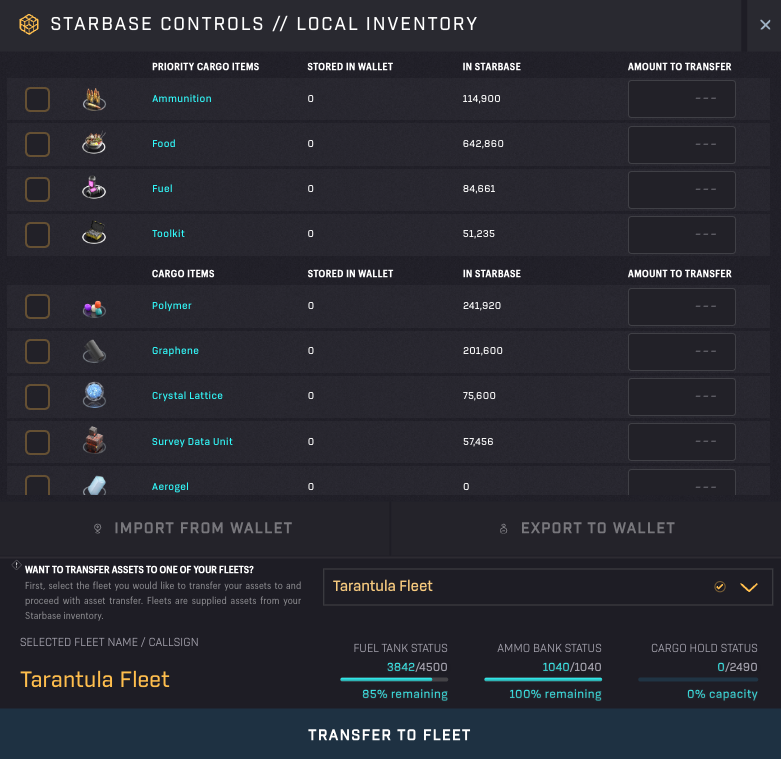
Starbased – Local Inventory
We’ve seen this screen before when discussing depositing assets from your wallet to the game (and vice-versa) in Chapter 1. When you have a docked fleet, you are also able to move assets between the Starbase and the fleet.
First, select the resources (click the checkboxes to their left) you want to transfer to the fleet, just as you did when importing assets into the game before. You can then set a custom amount using the input boxes on the right-hand side. Note that you can only transfer resources that are available at the Starbase to a fleet. You can not directly transfer assets from your wallet to a fleet.
If you were withdrawing, you would click the Export to Wallet button. But we’re not! Instead, click the dropdown menu beneath this button that states, “Make a fleet selection to proceed”.
This dropdown lists all of your docked fleets. Select the one you want to transfer items to. Now, some fleet details pop into the view right beneath the dropdown, showing –most importantly– the available cargo space.
As long as this number does not turn red, you are good. If it does turn red, you have exceeded the Cargo capacity of the fleet and can not complete the transaction.
Once you’re good, click the Transfer to Fleet button at the bottom of the dialog to transfer the resources to the fleet. Sign the transaction, and you will see the resources in the Starbase disappearing. If you go check the Fleet details in the Hangar, you will notice that your fleet’s cargo hold now contains the items you moved there.
Unloading Cargo from your Fleet
If you want to unload cargo from your fleet to a Starbase (or just see what cargo it has), you will need to follow a different route. Go to the Hangar instead through the Starbase Controls. Here, you will see an overview of your docked fleets. Click the fleet whose cargo you want to unload to open its details:
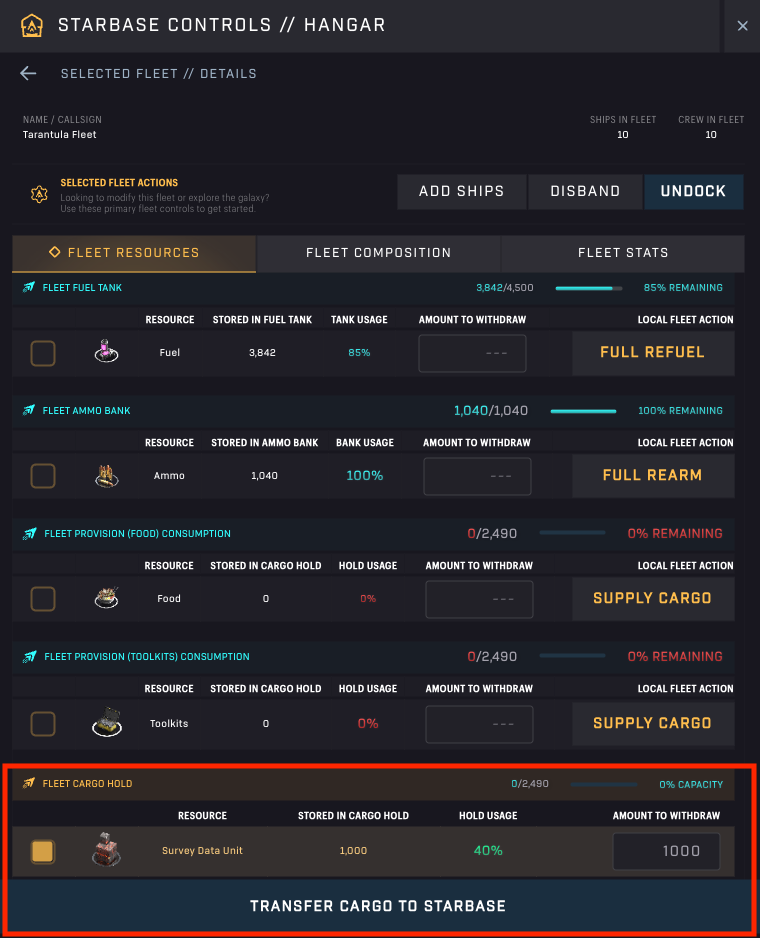
Starbased – Hangar – Unload Cargo (red accents by us)
There is a lot to see here, but we’ve covered most of that in the Fleet chapter earlier. At this point, we are only interested in the bottom part, the Fleet Cargo Hold. Here, you see a list of all the assets the fleet has stored in its cargo hold. Simply select the asset you want to transfer to your Starbase and optionally provide a specific amount in the input box on the far right.
Click the Transfer Cargo to Starbase button and sign the transaction that pops up to effectuate this change!
Disbanding
When you disband a fleet, all of its cargo will be moved to the Starbase. This also includes its Fuel and Ammo, which are stored separately. If you are planning on disbanding anyway, this may save you some time.
You’ve reached the end of Part 1!
Continue with Part 2 to learn how to mine, scan, and craft in Starbased!